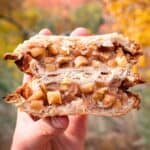
Pie Iron Apple Pie
This crispy Pie Iron Apple Pie is perfect for grilling and campfire fun! The recipe is gluten-free, dairy-free, and vegan, with lots of versatility to make it your own.
Servings 2
Calories 520kcal
Ingredients
The Filling
- 2 tablespoons coconut oil or butter
- 2 medium apples , diced, peeled if you like
- ½ teaspoon cinnamon
- ¼ teaspoon nutmeg
- 1 teaspoon lemon zest
- 2 tablespoons maple syrup
- 3 tablespoons tapioca starch to thicken. You can use regular flour or gluten-free flour as a substitute.
The Crust:
- 4 large slices of bread , you may need extra slices if your bread is smaller than the pie iron
- 3 tablespoons coconut oil or butter
Instructions
The Filling
- Melt coconut oil in a pan on medium-high heat. Then add apples, cinnamon, nutmeg, and lemon zest. Cook for about 7 minutes until apples soften, stirring on occasion to prevent burning.
- Add maple syrup and cook for another 3 minutes, stirring consistently. Then turn off the heat, add tapioca starch and stir to combine. The texture should be sticky and gooey without too much extra liquid.
Using the Pie Iron
- Place a pat of butter/coconut oil on each side of the pie iron. Then place one large slice of bread across each side. If bread is too small, patch the holes with additional pieces of bread. Bread should fill the entire iron with the crust sticking out the side.
- Add ⅓ to ½ cup of filling to one side. Then close the iron. Make sure to maintain the proper positioning of the latch so it doesn’t break. If you have latches and hooks farther up the handle, make sure to secure these too.
- Use a knife to trim the bread outside of the iron. The more you trim, the less likely your pie is to catch fire.
- Roast over the fire for 5 to 10 minutes. We like to keep the irons just over the flames and open the pie iron after about 5 to 7 minutes to check for desired crispiness. I roast mine until golden brown.
- Remove the pie and enjoy warm! Usually one side will loosen more easily (this becomes the top) and we use a metal spork to loosen the edges of the bottom.
Notes
Don't skimp on the butter! Otherwise your pie will taste more like an apple sandwich and it will stick to the pie iron.
Feel free to add other fun ingredients to the filling like honey, raisins, lemon zest — whatever suits you!
Add more maple syrup if the apples are tart. We picked an apple variety that didn’t need much sweetening. It’s always a good idea to taste your filling before it’s finished.
Don't leave the starch out of the pie filling. Starch makes it gooey and sticky and helps it hold form. This prevents the pie filling from squishing out the side!
Nutrition
Calories: 520kcal | Carbohydrates: 77g | Protein: 7g | Fat: 24g | Saturated Fat: 18g | Polyunsaturated Fat: 1g | Monounsaturated Fat: 2g | Trans Fat: 0.01g | Sodium: 269mg | Potassium: 326mg | Fiber: 7g | Sugar: 34g | Vitamin A: 102IU | Vitamin C: 10mg | Calcium: 110mg | Iron: 2mg