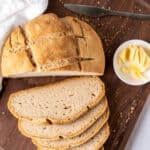
Gluten-Free Artisan Bread With Psyllium Husk Powder
This gluten-free artisan bread is a near-perfect copycat of traditional artisan style loaves! With just a few authentic ingredients, you can create a kneadable gluten-free dough with excellent rise and a traditional flavor.
Servings 12 slices
Calories 190kcal
Ingredients
- 2 ¼ cup water (532 ml)
- 2 tablespoons sugar
- 2 ¼ teaspoon active dry yeast , or 1 packet
- 4 cups all purpose gluten free flour with xanthan gum (I used Bob's Red Mill 1-to-1 gluten-free baking flour) (555 grams)
- 3 tablespoons psyllium husk powder (23 grams)
- 2 ½ teaspoons salt
- ⅓ cup olive oil , or another oil of your choice (59 ml)
Instructions
- Activate the yeast: Warm the water to 105 degrees F in the microwave or on the stove. Stir in the sugar until it dissolves, then add the active dry yeast and stir. Set aside for 5 minutes or until the yeast begins frothing. If there is no frothing, your yeast is bad and you need to try again with new yeast.2 ¼ cup water, 2 tablespoons sugar, 2 ¼ teaspoon active dry yeast
- Whisk the flour mixture: Meanwhile, whisk together the gluten-free flour, psyllium husk powder, and salt.4 cups all purpose gluten free flour, 2 ½ teaspoons salt, 3 tablespoons psyllium husk powder
- Make the dough: Make a well in the center of the flour mixture and add the water and yeast mixture. Stir together using a wooden spoon. When stirring becomes difficult, add the oil and continue mixing. When stirring becomes difficult again, lightly flour your hands (with gluten-free flour) and continue mixing the dough until it is uniform. Then let it rest for 5 minutes while the flour and psyllium husk powder absorb the liquid.⅓ cup olive oil
- Knead: Lightly dust your hands and a smooth surface with gluten-free flour. Scoop up the dough and begin kneading vigorously, just like you would with traditional bread dough. You will need to knead this dough for 5-10 minutes, until smooth and uniform. Five minutes of light to moderate kneading will still provide a good result. For best results, knead until the dough texture passes the poke test or the window test. See the Expert Tips section of the blog post for photos and more help with kneading dough.
- Oil and form a loaf: When the dough passes the kneading tests, pour and spread just a little bit of oil (about ½ teaspoon is fine) along the bottom of the original mixing bowl. Place your dough ball in the bowl and gently turn the ball so that all sides are very lightly coated with oil. When finished, set in the bowl with any seams on the bottom.
- Let rise: Loosely cover the dough and bowl with a towel and set in a warm place to rise for 2 hours or until the loaf has doubled in size. See notes for suggestions if your house is cold. As you near the end of the rising time, place your oven racks in the middle and bottom of your oven and preheat the oven to 475 degrees F. Lightly grease a large baking sheet with olive oil.
- Score: Very gently transfer the dough to the prepared baking sheet. Then, using a bread lame, razor blade, or very sharp knife, score the bread in whatever pattern you like! I did a simple criss cross pattern in my photos but this loaf can definitely handle a bit more artistry. Make cuts about ¼ inch thick to just break the taught outer layer.
- Bake: On the bottom rack of the oven, place a deep baking pan with 1 -1 ½ cups of boiling water. On the rack above it, place your bread loaf. Keep the oven solidly closed and bake the loaf at 475 degrees F for 20 minutes. Then remove the pan of water and reduce the temperature to 425 degrees F for an additional 40 minutes, or until the loaf is finished baking. You know the artisan bread is finished baking when the crust is solidly medium brown in color, tapping a fingernail on the crust creates a hollow sound, and the internal temperature of the loaf is 205 degrees F (temperature is the most accurate test for doneness).
- Cool: Allow the loaf to cool on the pan for 10 minutes. Then gently transfer to a cooling rack to cool completely before slicing and eating.
Notes
See the blog post for step-by-step photos, additional ingredient information if needed, FAQs and expert tips on kneading and baking gluten-free bread.
Storage: Store leftover gluten-free artisan bread at a cool room temperature wrapped snugly in foil or plastic wrap for 3-4 days.
Extra GF flour for dusting: When kneading, be careful not to add too much additional gluten-free flour to prevent sticking. About 2 tablespoons is a good maximum, and I measure it out ahead of time. There will be a short sticky phase, just like with regular bread dough, and it's best to knead through it.
Dutch oven baking, cast iron, & Brotforms: Experienced bread makers may want to experiment with these tools and methods. Since I'm new to gluten-free artisan bread baking, I wanted to make this recipe as accessible to myself and others as possible. Stay tuned for details and instructions as I master these tools too! And if you have experience to share, I'd love if you'd offer advice in the comments.
Gluten-Free Flours: I used Bob's Red Mill 1-to-1 Baking flour for this and all of my bread recipes. It's often the easiest to buy in bulk, and available in many locations globally. The bag states "not for use on yeasted breads" but it worked just fine in this and my other yeasted bread recipes. I cannot claim that other brands labeled this way will also work.
Psyllium husk: You do need to use psyllium husk powder to make this bread kneadable. I have more details on how it works and if it's worth the purchase in the ingredients section of the blog post. For gluten-free bread recipes without psyllium husk, check out my gluten-free baguettes, gluten-free no-knead bread, and gluten-free Irish soda bread.
Bread rising in a cold home: When my home is too cold in winter for a good rise, I set the oven to 100 degrees F and then turn it off when it reaches that temperature. Then I open the oven and place the bowl of dough in the oven while it remains off. Be sure to remove the dough and bowl before preheating the oven.
Nutrition
Calories: 190kcal | Carbohydrates: 33g | Protein: 4g | Fat: 6g | Saturated Fat: 1g | Polyunsaturated Fat: 1g | Monounsaturated Fat: 4g | Sodium: 390mg | Potassium: 6mg | Fiber: 6g | Sugar: 3g | Vitamin C: 0.002mg | Calcium: 28mg | Iron: 1mg