
This gluten-free artisan bread with psyllium husk powder is made with 6 simple ingredients and creates a truly kneadable dough with great rise and a bakery-style crust. With gluten-free all purpose flour, yeast, olive oil and our secret ingredient, you'll make authentic gluten-free bread that rises well and is beginner-friendly. There is no need to make your own gluten-free flour blend for this recipe.
My secret ingredient is psyllium husk powder, which is the only substance that can turn gluten-free flour into a truly kneadable dough. This is the perfect recipe if you miss kneading dough like I did, or are hoping to have that old fashioned experience and flavor yourself or with your family.
Keep it simple and skip to the recipe, or read all the tips to start building your expert gluten-free bread baking knowledge.
Jump to:
What is artisan bread?
Artisan bread is a loaf of homemade bread served alongside a typically homemade meal. It is simple, usually made with water instead of milk, and has a little oil and sometimes added spices for flavor. It is reminiscent of simpler times when homemade bread and kneading dough was a frequent family tradition.
Inspired by traditional artisan breads, this gluten-free artisan bread uses the exact same ingredients with one simple addition. Psyllium husk powder is added to mimic gluten and create a stretchable, kneadable dough.
This post will walk you through why psyllium husk powder is absolutely worth having on hand for gluten-free baking, how to knead gluten-free dough, and how to make the perfect gluten-free artisan bread.
This gluten-free artisan bread was inspired by my gluten-free white sandwich bread. For no-knead alternatives, check out my gluten-free baguettes and no-knead gluten-free bread.
And if you're looking for another amazing bread recipe that doesn't use yeast, check out my Gluten-Free Irish Soda Bread.
How to make it (with photos)
Learn how to make your very own gluten-free artisan loaf with simple ingredients and a traditional method.
Ingredient Notes + Substitutions
Unlike many gluten-free bread recipes, this gluten-free artisan bread is simple with only 6 mostly common ingredients. You only need an all-purpose gluten-free flour, sugar, yeast, salt, olive oil, and psyllium husk powder, plus warm water.
Below the photo I have notes on selecting each and why psyllium husk powder is worth the buy for making gluten-free bread!
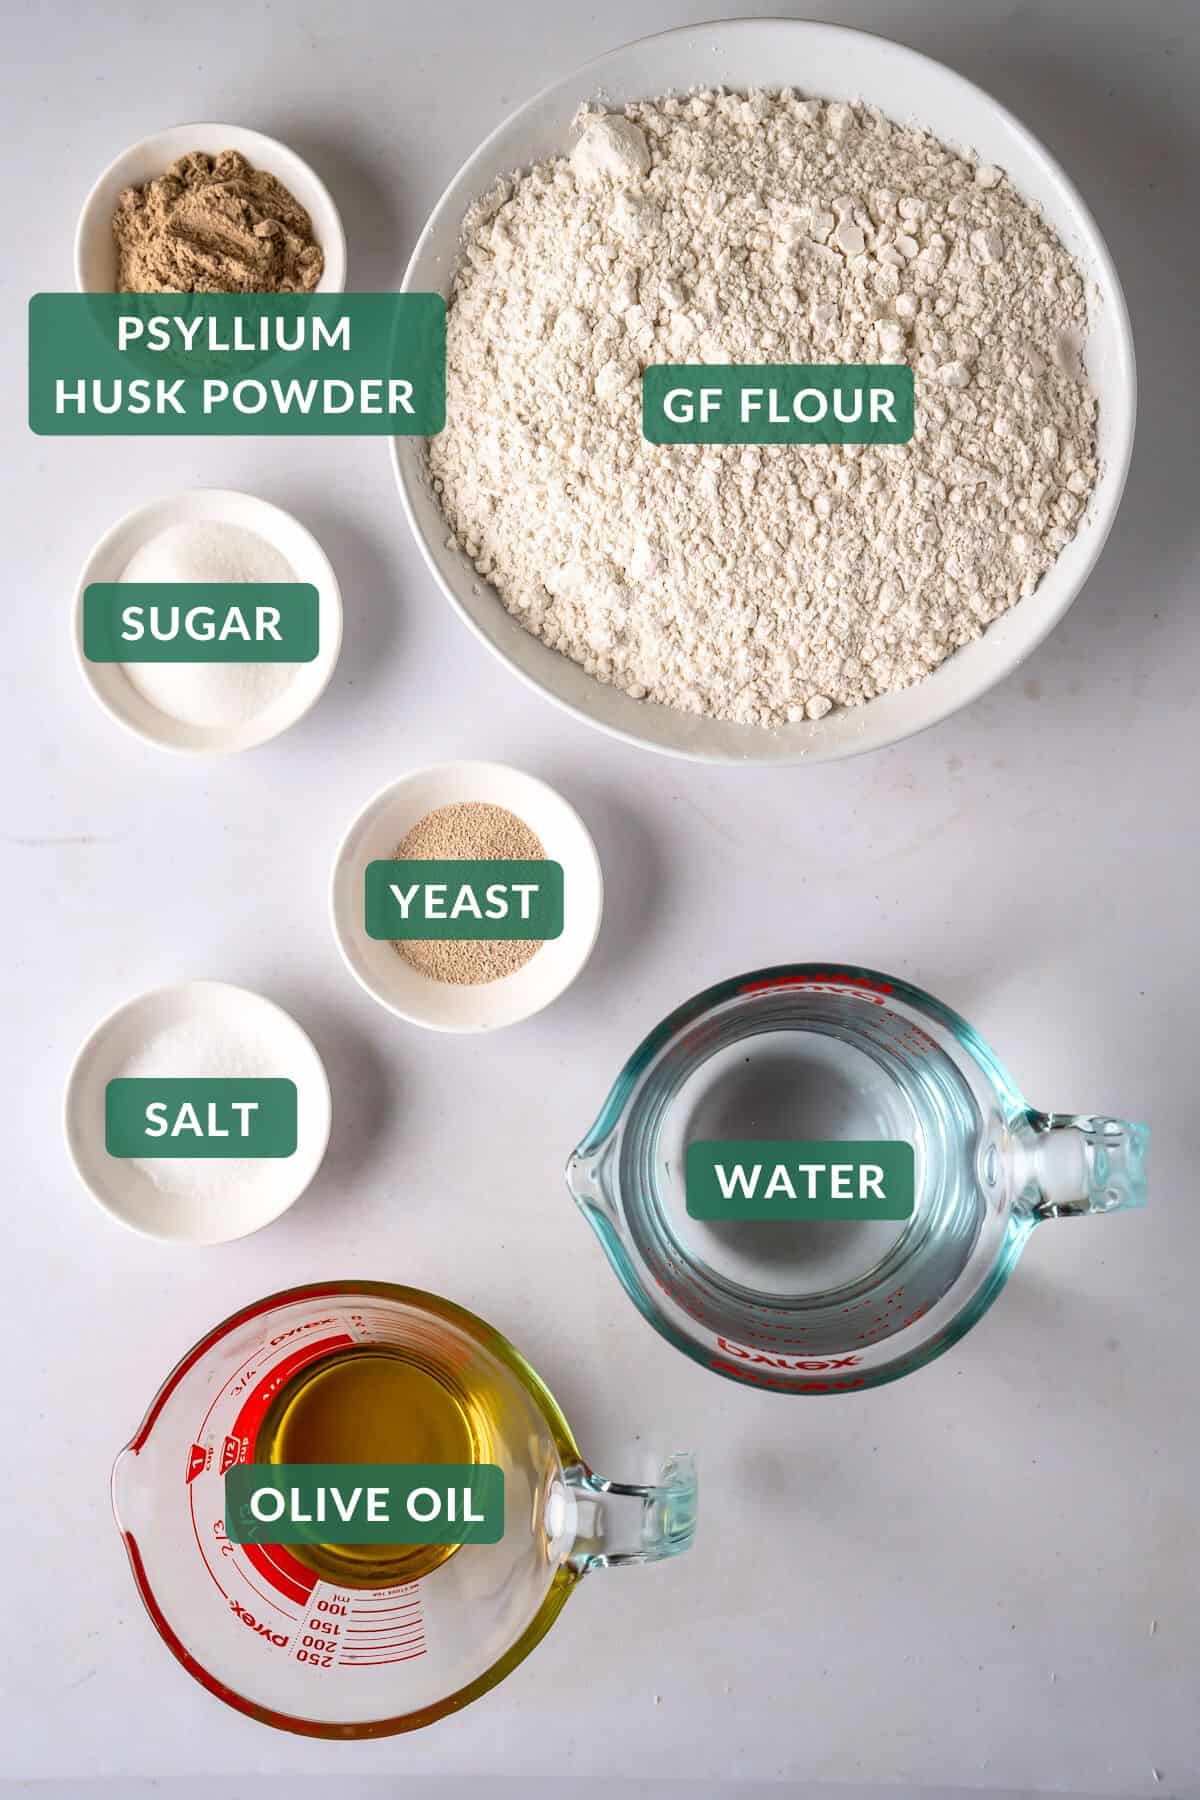
Yeast
In my many bread experiments, I saw the best rise when using active dry yeast and activating it in warm water or milk before adding it to the flour mixture.
Many online sources claim that you can simply use instant yeast and add it to the flour, and while this still worked, the bread dough rise was not as significant.
You can technically use either, but for the best rise, use active dry yeast in this recipe and follow my instructions.
Sugar
Sugar is food for the yeast, and therefore cannot be left out. You can also use honey or maple syrup, but I prefer the neutral taste of just a little white sugar.
If making this bread with dairy milk instead of water, you can technically omit the sugar if you like, only adding it back if the yeast is not properly frothing.
Gluten-Free All Purpose Flour
I used Bob's Red Mill 1-to-1 gluten-free baking flour (blue bag). While the package says that it is "not intended for baking with yeast", this flour worked perfectly in this and my other yeasted bread recipes.
While this gluten-free flour blend has xanthan gum, I'm not entirely sure it's necessary since I did not try this recipe without it, and psyllium husk powder is a good substitution for a gluten-like binder. If using a flour without xanthan gum, I recommend adding ¼ teaspoon of xanthan gum per cup of flour.
Psyllium Husk Powder
I tried to make this gluten free artisan bread without any unusual ingredients, but was absolutely blown away by the effects of psyllium husk powder! Psyllium husk powder decreases the stickiness of the dough while holding the dough together to make a truly kneadable gluten-free bread dough.
Psyllium husk powder is unlike any other bread additive I've seen or used. It allows you to properly knead the dough, which stretches the dough to add flexibility. This flexibility helps it rise high without cracking or breaking apart. I'll share more on *why* you want to knead dough later, but if you don't have psyllium husk powder and aren't sold on kneading, you'll want to check out my no knead gluten-free bread.
Despite what the internet may tell you, you cannot substitute chia seeds, flaxseed, egg, gums, or other binders for the psyllium husk powder in this recipe and get the same result. I tried all of these (minus egg, since my daughter has an allergy) and they have completely different textures and results. Psyllium husk powder is also the only one of these binders that has a truly neutral taste.
If you've been here a while, you know I rarely recommend buying a new unusual ingredient. But psyllium husk powder is 100% worth it if you're committed to making seriously good gluten-free bread! I also use it in my gluten-free white sandwich bread recipe and will be experimenting with it as a variation in some of my other baking recipes.
Olive Oil
Olive oil is traditional but you can replace it with any liquid oil of your choosing.
See recipe card for a full list of ingredients with quantities.
Variations
This is a true old-fashioned artisan bread made gluten-free! Which means you can change the oil, add spices (like rosemary), or swap milk for water.
Here are two other written-up gluten-free bread variations that may suit your needs:
With Milk
My gluten-free sandwich bread is nearly the same as this recipe and made with milk and a neutral oil for that classic white bread flavor and richness. You can bake it as a loaf or follow the baking instructions in this post to make a round artisanal bread loaf.
No Knead
This bread recipe is significantly less impressive without kneading. The true beauty of this recipe is that it is made *exactly like regular bread* but completely gluten-free! If you don't have time and are looking for a quicker no-knead option, this no knead gluten free bread is similar and an excellent alternative.
Step-by-Step Instructions
There are 8 simple steps to make a good simple gluten-free artisan bread. It's beginner friendly, and be sure to check out my expert tips on kneading if you're new to the skill.

- Activate the yeast: Warm the water to 105 degrees F in the microwave or on the stove. Stir in the sugar until it dissolves, then add the active dry yeast and stir. Set aside for 5 minutes or until the yeast begins frothing. If there is no frothing, your yeast is bad and you need to try again with new yeast.
- Whisk the flour mixture: Meanwhile, whisk together the gluten-free flour, psyllium husk powder, and salt.
- Make the dough: Make a well in the center of the flour mixture and add the water and yeast mixture. Stir together using a wooden spoon. When stirring becomes difficult, add the oil and continue mixing. When stirring becomes difficult again, lightly flour your hands (with gluten-free flour) and continue mixing the dough until it is uniform. Then let it rest for 5 minutes while the flour and psyllium husk powder absorb the liquid.
- Knead: Lightly dust your hands and a smooth surface with gluten-free flour. Scoop up the dough and begin kneading vigorously, just like you would with traditional bread dough. You will need to knead this dough for 5-10 minutes, until smooth and uniform. Five minutes of light to moderate kneading will still provide a good result. For best results, knead until the dough texture passes the poke test or the window test. See the Expert Tips section of the blog post for photos and more help with kneading dough.
- Oil and form a loaf: When the dough passes the kneading tests, pour and spread just a little bit of oil (about ½ teaspoon is fine) along the bottom of the original mixing bowl. Place your dough ball in the bowl and gently turn the ball so that all sides are very lightly coated with oil. When finished, set in the bowl with any seams on the bottom.
- Let rise: Loosely cover the dough and bowl with a towel and set in a warm place to rise for 2 hours or until the loaf has doubled in size. See notes for suggestions if your house is cold. As you near the end of the rising time, place your oven racks in the middle and bottom of your oven and preheat the oven to 475 degrees F. Lightly grease a large baking sheet with olive oil.
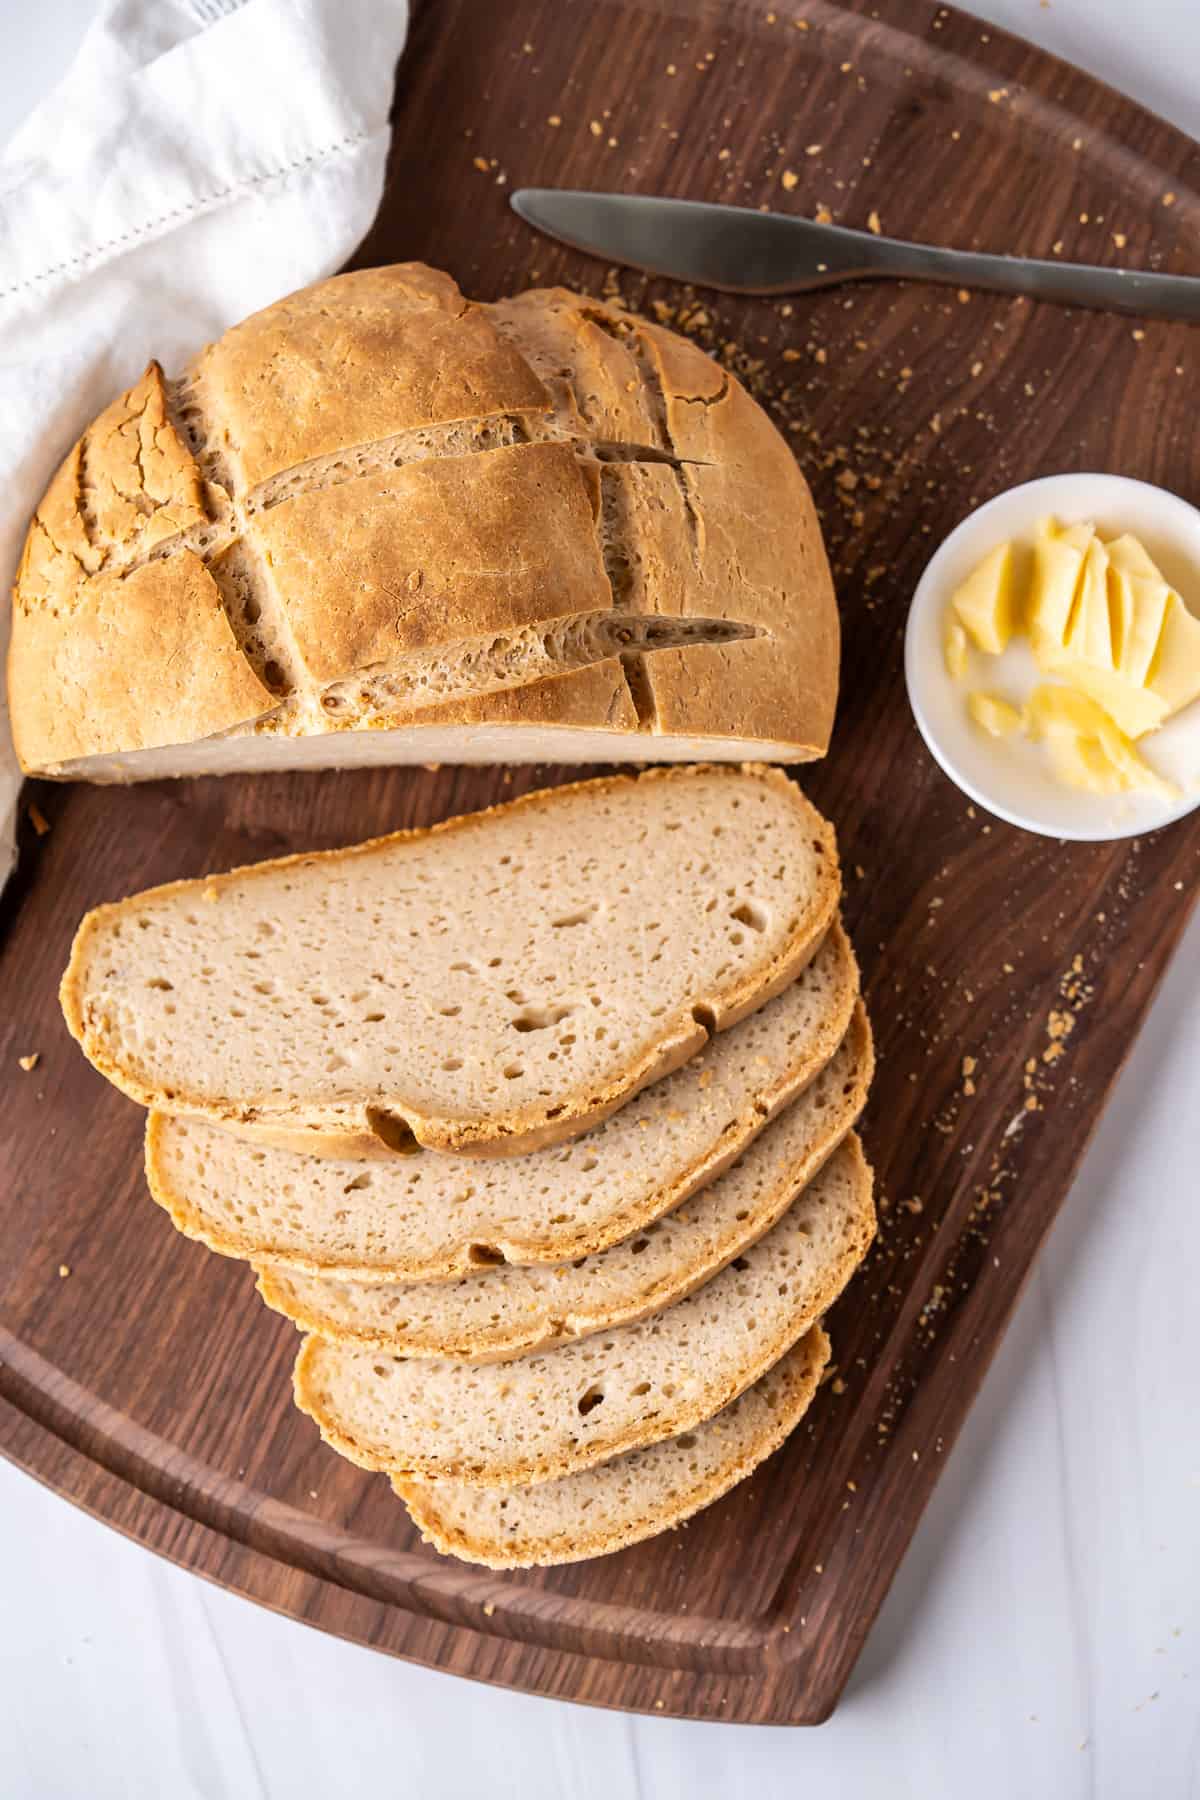
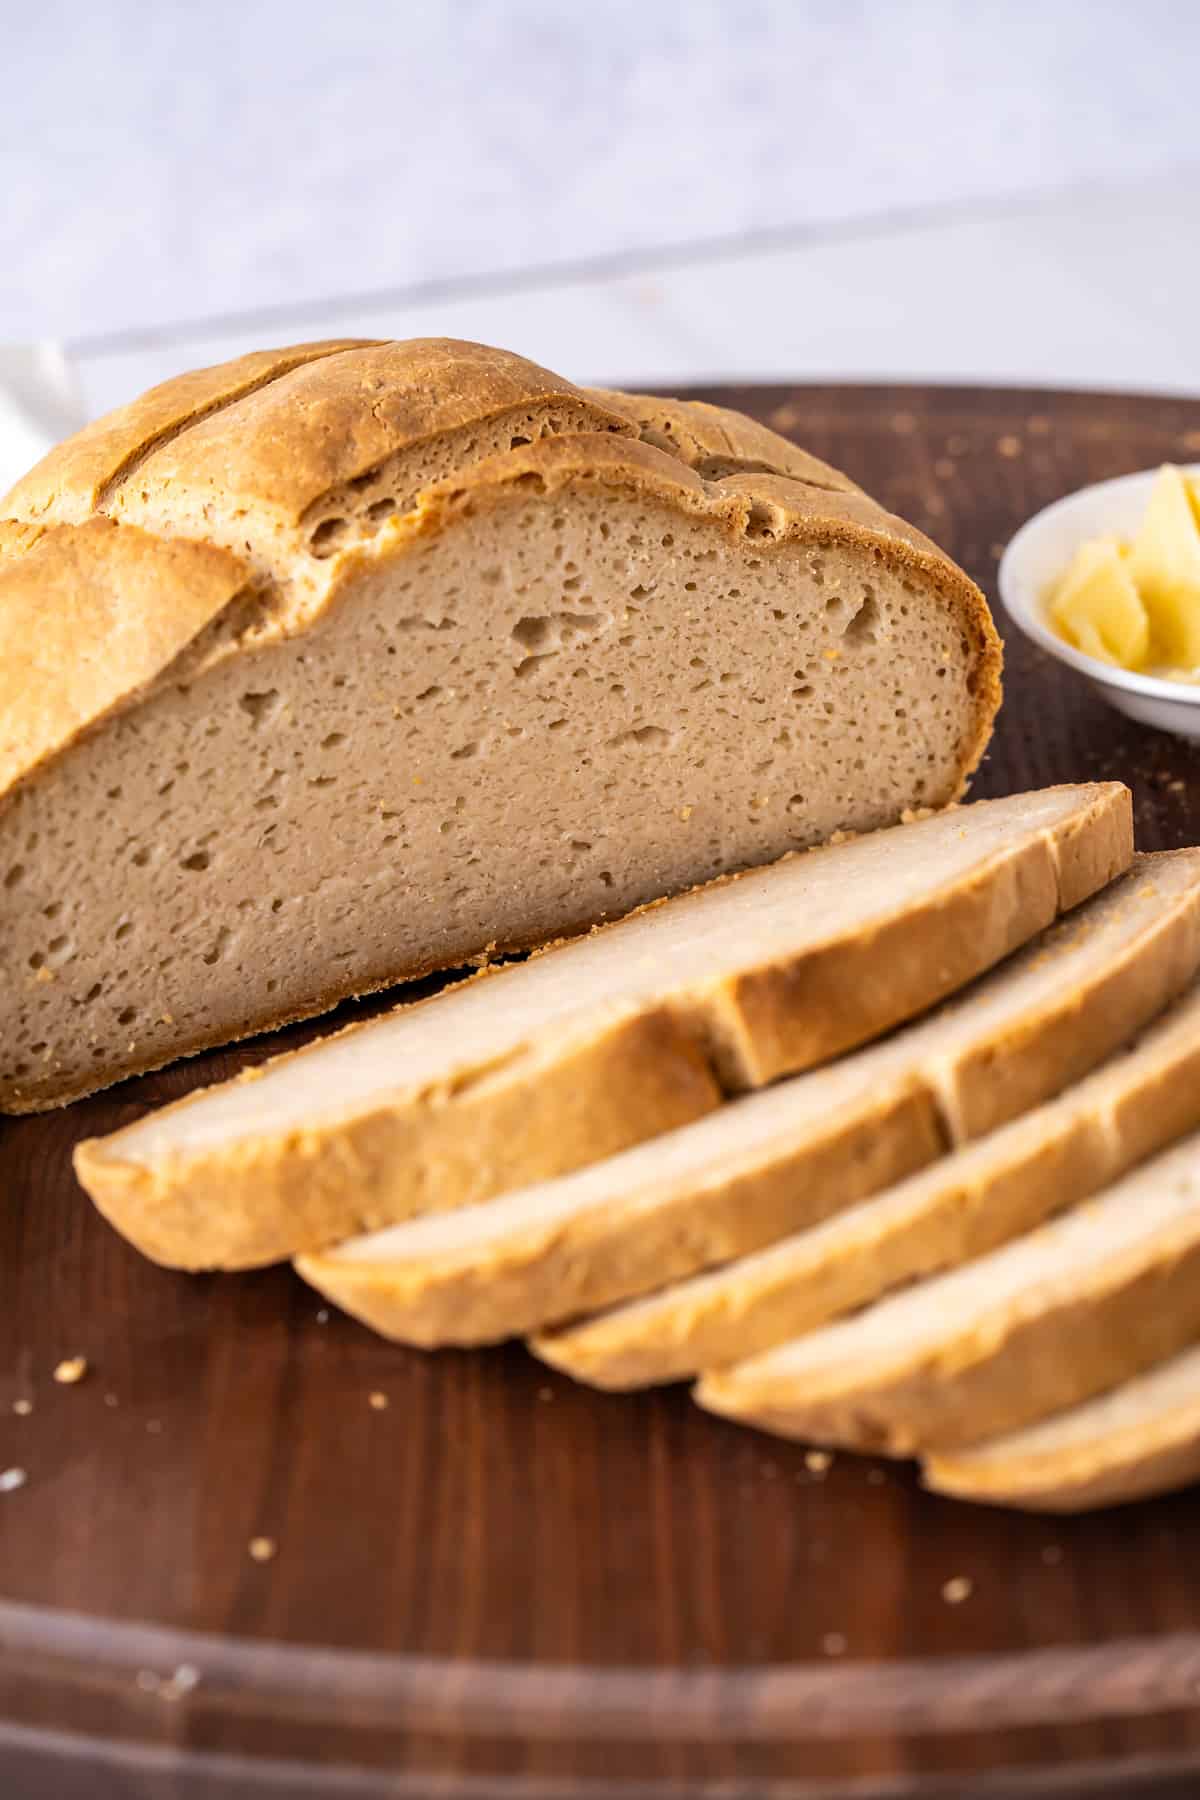
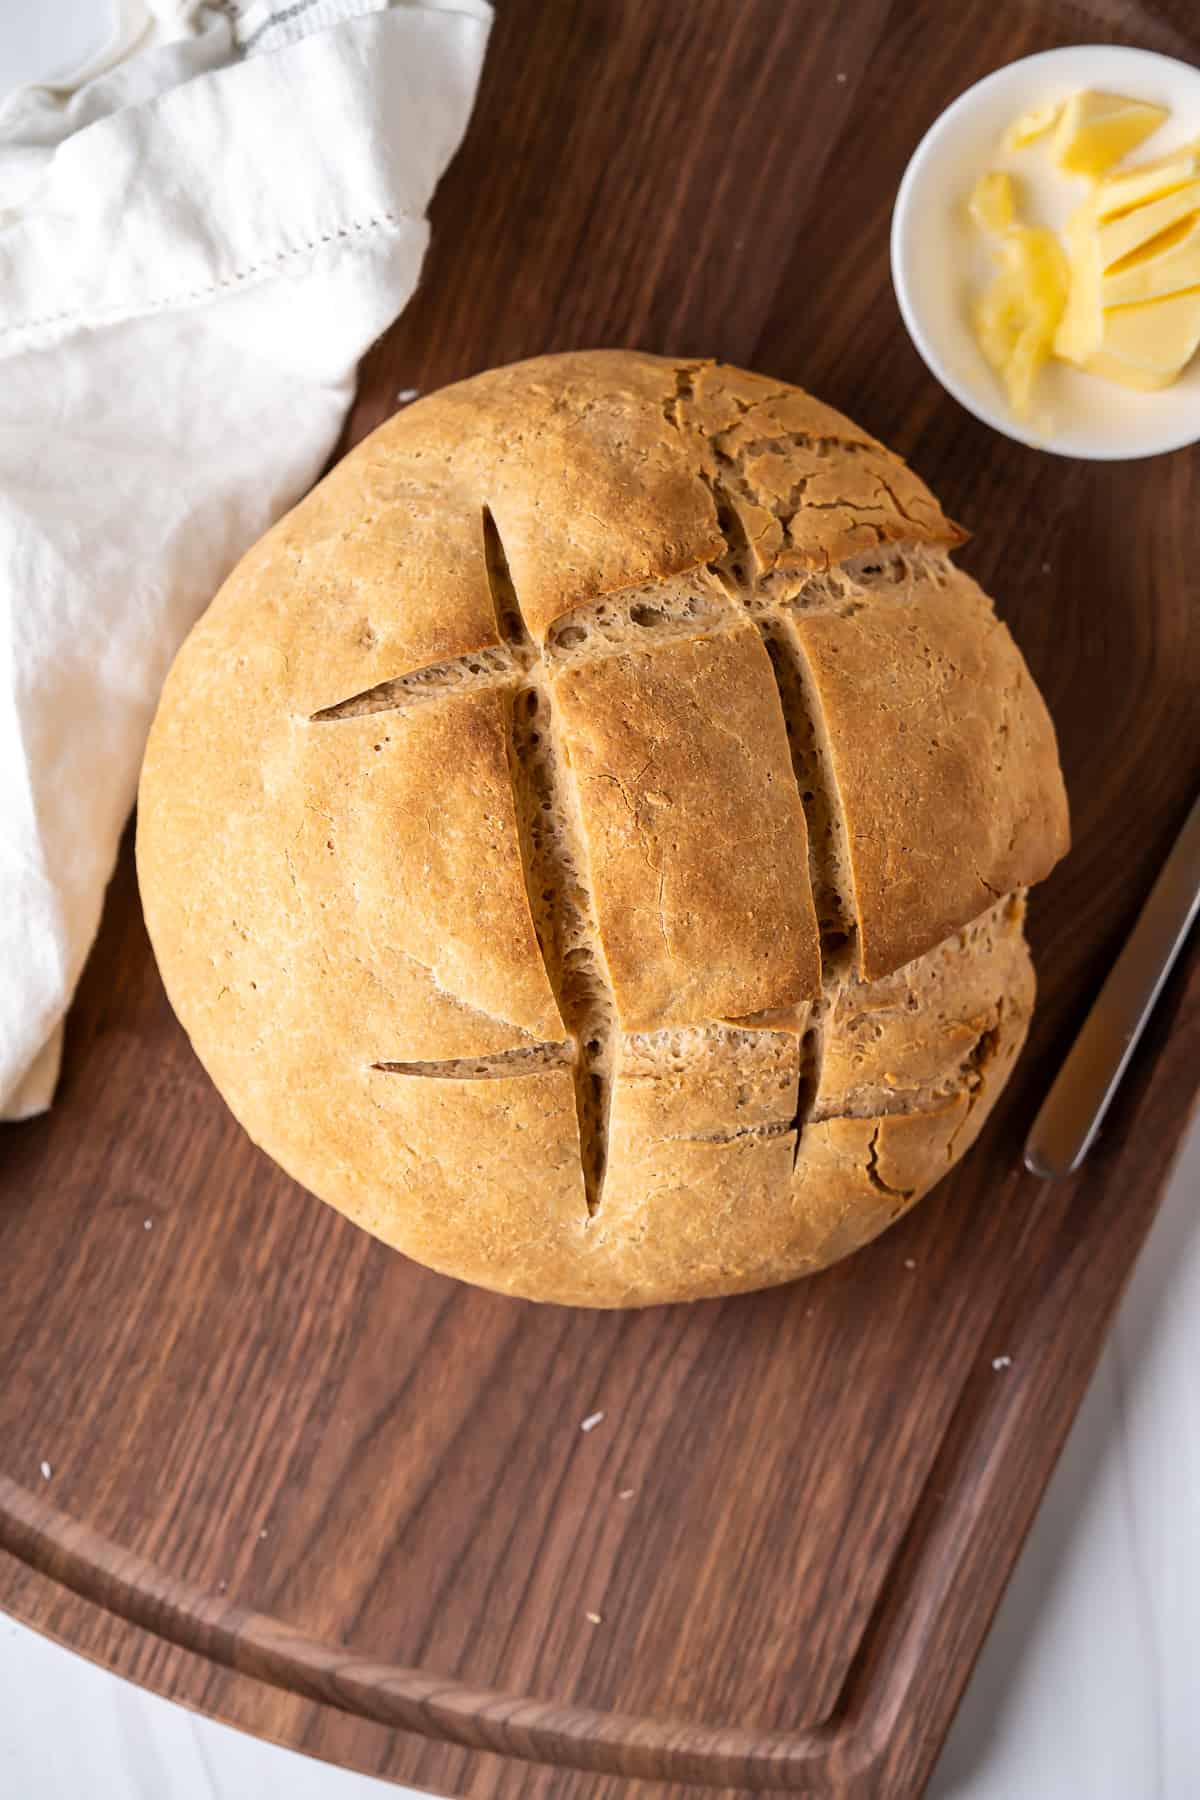
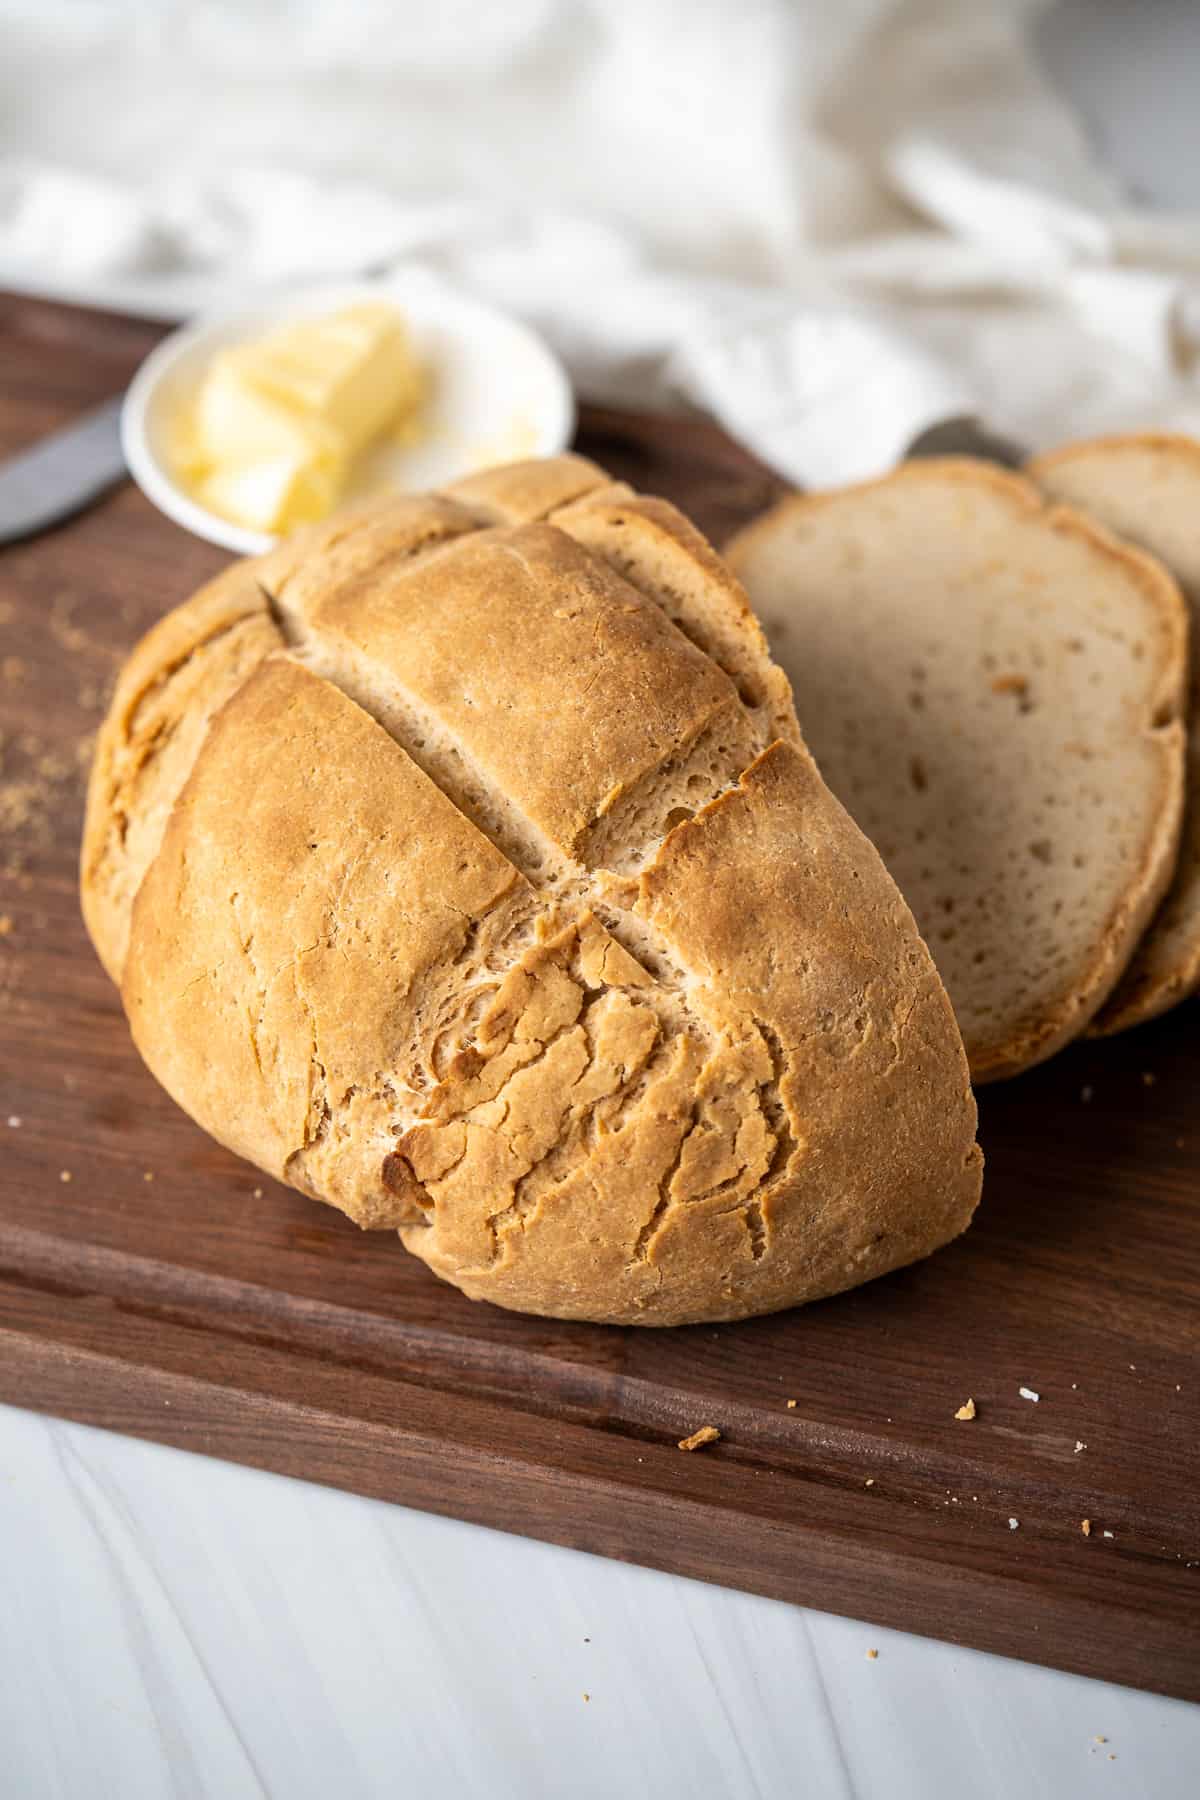
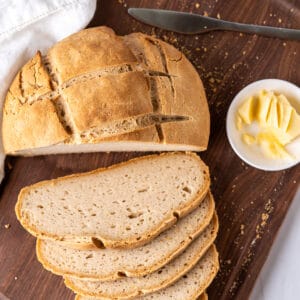
- Score: Very gently transfer the dough to the prepared baking sheet. Then, using a bread lame, razor blade, or very sharp knife, score the bread in whatever pattern you like! I did a simple criss cross pattern in my photos but this loaf can definitely handle a bit more artistry. Make cuts about ¼ inch thick to just break the taught outer layer.
- Bake: On the bottom rack of the oven, place a deep baking pan with 1 -1 ½ cups of boiling water. On the rack above it, place your bread loaf. Keep the oven solidly closed and bake the loaf at 475 degrees F for 20 minutes. Then remove the pan of water and reduce the temperature to 425 degrees F for an additional 40 minutes, or until the loaf is finished baking. You know the artisan bread is finished baking when the crust is solidly medium brown in color, tapping a fingernail on the crust creates a hollow sound, and the internal temperature of the loaf is 205 degrees F (temperature is the most accurate test for doneness).
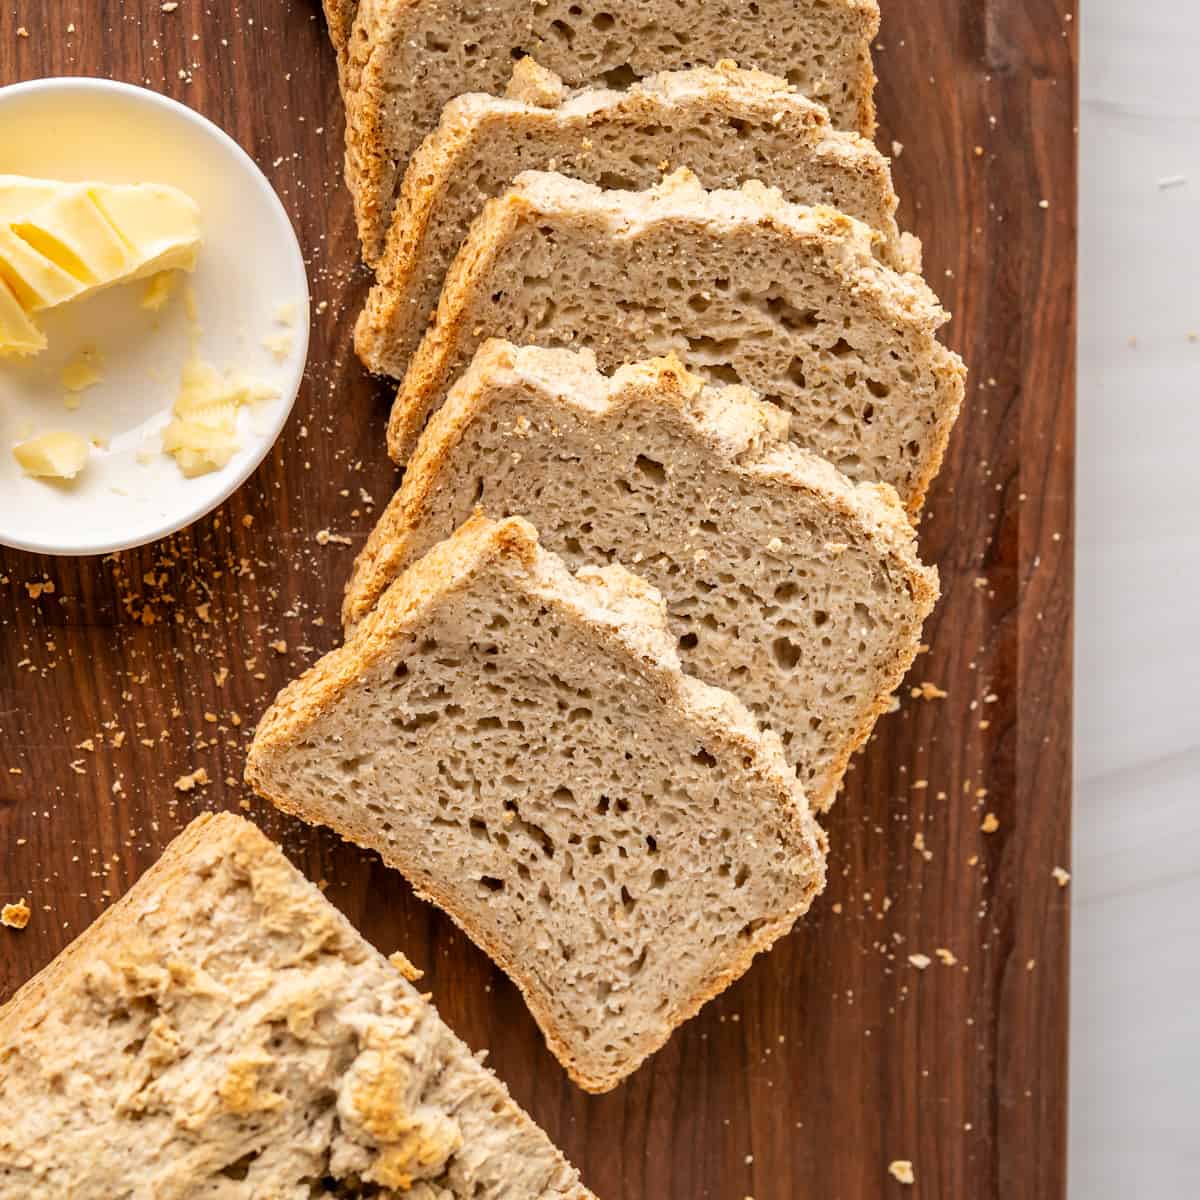
- Cool: Allow the loaf to cool on the pan for 10 minutes. Then gently transfer to a cooling rack to cool completely before slicing and eating.
Expert Tips
These tips will help you make amazing gluten-free artisan bread on the first try!
Limit the GF Flour for dusting.
When kneading, be careful not to add too much additional gluten-free flour to prevent sticking. About 2 tablespoons is a good maximum, and I measure it out ahead of time. There will be a short sticky phase, just like with regular bread dough, and it's best to knead through it.
Knead until the dough passes the poke or window tests.
For the poke test, press the dough with your finger and see if it springs back slowly. It should come back at least halfway.
For the window test, hold a piece of dough up to the light and stretch it very gently so it's thin enough for light to pass through without breaking. In my experience, the window test is the most helpful done-ness test for this bread dough. If it fails, knead a little longer and try again.

I'll record my own version of a kneading video specifically for gluten-free bread, but this one from Sally's Baking Addiction is super helpful for basic kneading instructions AND the poke and window tests in the meantime.
Use the GF bread's internal temperature to determine when it's done baking.
Inserting a thermometer into the center of the loaf is the best way to know if it is truly done baking. Different gluten-free flours brown differently, so the crust color is not always accurate.
Look for a temperature of around 210 degrees F (96 degrees C). The actual best temperature is whatever the boiling point is at your elevation. Then let the gluten-free bread cool before slicing so it doesn't dry out.
Expert Tools
If you're an expert bread baker, you'll know that there are quite a few ways you can change the process for different results. These include using a dutch oven for baking, baking in cast iron, or using a brotform for dough rise.
Many of these techniques can still be used with gluten-free bread. However, I have only just begun experimenting with these tools and cannot currently offer guidance. Please leave your successes and trials in the comments to help out the community!
Recipe FAQs
Here I answered some frequently asked questions about this simple gluten-free artisan bread. Don't see your question? Leave it in the comments at the end of this post and I'll answer within two business days.
Store leftover gluten-free artisan bread at a cool room temperature wrapped snugly in foil or plastic wrap for 3-4 days.
You can freeze leftover gluten-free artisan bread, and it's a great option for saving it for later. I recommend waiting for it to cool completely before slicing or storing. Then wrap tightly in plastic wrap (multiple layers is best to retain moisture) and freeze for up to 3 months.
If slicing before freezing, I recommend wrapping in bundles of 2-3 slices for best moisture retention.
Technically, you can bake this dough without kneading. However, the loaf will be more dense and does not rise as well. This is because kneading stretches the dough so that it stays together around the bubbles (made by the yeast) rather than breaking the surface of the dough and leaving.
If you choose not to knead the dough, I recommend making my no-knead gluten-free bread or gluten-free french baguettes instead.
Related gluten-free bread recipes to consider...
Looking for more simple gluten-free bread recipes like this gluten-free artisan bread? Check these out:


Love this recipe? Please leave a 5-star 🌟🌟🌟🌟🌟 rating in the comments below. Thank you!
📖 Recipe
Gluten-Free Artisan Bread With Psyllium Husk Powder
Ingredients
- 2 ¼ cup water (532 ml)
- 2 tablespoons sugar
- 2 ¼ teaspoon active dry yeast , or 1 packet
- 4 cups all purpose gluten free flour with xanthan gum (I used Bob's Red Mill 1-to-1 gluten-free baking flour) (555 grams)
- 3 tablespoons psyllium husk powder (23 grams)
- 2 ½ teaspoons salt
- ⅓ cup olive oil , or another oil of your choice (59 ml)
Instructions
- Activate the yeast: Warm the water to 105 degrees F in the microwave or on the stove. Stir in the sugar until it dissolves, then add the active dry yeast and stir. Set aside for 5 minutes or until the yeast begins frothing. If there is no frothing, your yeast is bad and you need to try again with new yeast.2 ¼ cup water, 2 tablespoons sugar, 2 ¼ teaspoon active dry yeast
- Whisk the flour mixture: Meanwhile, whisk together the gluten-free flour, psyllium husk powder, and salt.4 cups all purpose gluten free flour, 2 ½ teaspoons salt, 3 tablespoons psyllium husk powder
- Make the dough: Make a well in the center of the flour mixture and add the water and yeast mixture. Stir together using a wooden spoon. When stirring becomes difficult, add the oil and continue mixing. When stirring becomes difficult again, lightly flour your hands (with gluten-free flour) and continue mixing the dough until it is uniform. Then let it rest for 5 minutes while the flour and psyllium husk powder absorb the liquid.⅓ cup olive oil
- Knead: Lightly dust your hands and a smooth surface with gluten-free flour. Scoop up the dough and begin kneading vigorously, just like you would with traditional bread dough. You will need to knead this dough for 5-10 minutes, until smooth and uniform. Five minutes of light to moderate kneading will still provide a good result. For best results, knead until the dough texture passes the poke test or the window test. See the Expert Tips section of the blog post for photos and more help with kneading dough.
- Oil and form a loaf: When the dough passes the kneading tests, pour and spread just a little bit of oil (about ½ teaspoon is fine) along the bottom of the original mixing bowl. Place your dough ball in the bowl and gently turn the ball so that all sides are very lightly coated with oil. When finished, set in the bowl with any seams on the bottom.
- Let rise: Loosely cover the dough and bowl with a towel and set in a warm place to rise for 2 hours or until the loaf has doubled in size. See notes for suggestions if your house is cold. As you near the end of the rising time, place your oven racks in the middle and bottom of your oven and preheat the oven to 475 degrees F. Lightly grease a large baking sheet with olive oil.
- Score: Very gently transfer the dough to the prepared baking sheet. Then, using a bread lame, razor blade, or very sharp knife, score the bread in whatever pattern you like! I did a simple criss cross pattern in my photos but this loaf can definitely handle a bit more artistry. Make cuts about ¼ inch thick to just break the taught outer layer.
- Bake: On the bottom rack of the oven, place a deep baking pan with 1 -1 ½ cups of boiling water. On the rack above it, place your bread loaf. Keep the oven solidly closed and bake the loaf at 475 degrees F for 20 minutes. Then remove the pan of water and reduce the temperature to 425 degrees F for an additional 40 minutes, or until the loaf is finished baking. You know the artisan bread is finished baking when the crust is solidly medium brown in color, tapping a fingernail on the crust creates a hollow sound, and the internal temperature of the loaf is 205 degrees F (temperature is the most accurate test for doneness).
- Cool: Allow the loaf to cool on the pan for 10 minutes. Then gently transfer to a cooling rack to cool completely before slicing and eating.


Jess Schnitzer says
Hi can I use instant yeast for this?
Jamie says
Instant yeast should work well, but I haven't tried it myself so there could be some variability. For instant yeast, use about 25% less than listed (a little more than 1 1/2 teaspoons) since it is more concentrated. Add it to the GF flour mixture in step 2 instead of activating it in step 1. Instant yeast can cause the dough to rise a little faster, so be on the lookout for that too. Please let us know how it goes if you try it!
Sandra K. says
Have taught myself how to make GF focaccia( with Instant Yeast, I proof this dough 8-9 hrs if mixed early in the AM or overnight if I put it together in late evening) and GF French baguettes ( made with Traditional Active yeast.-- requires up to 20 hours for the first proof and 11/2 to 2 hours for the 2nd proof) over the past year.
Both of these doughs are high hydration and are very sticky.
Firm silicone spatula and pqtience are my best friends as well as a dough scrape!
I have been GF for 10 years and for the first time since diagnosis I am eating bread that has crispy crusts, a soft airy crumb and can be eaten without toasting! especially the GF French baguettes!! (UNLIKE gritty like store bought GF bread). Both smell and taste like regular wheat flour freshly baked bread.
Nelly R says
Great recipe although the texture was a little close. I probably didn't knead enough and I used bread flour and psyllium husk not powder but my last three attempts at gf bread turned out like house bricks so I'm really chuffed with this recipe. It's brilliant
Jamie says
I'm glad it worked out! The texture definitely improves with practice kneading. The photos are of my fourth or fifth use of this recipe, but it's even lighter now that I have more experience.
David G says
I’ve tried this twice. Both times, it came out a bit dense and a little gummy. I improved on my process the second time, but I’m still doing something wrong. My guess is my kneading time. My question is: is it possible to over-knead this bread? What would the dough look like if you over-kneaded it? I will admit, I’m using my mixer to do the kneading, and I know you recommend doing it by hand. I kneaded for 10 minutes the first time. The second time, my research said that you should knead gf bread with a mixer any longer than 4-6 minutes, so I did it around 5 minutes.
Jamie says
Hi David! I think your intuition is correct, and it is possible to over-knead this bread. Over-kneading would make the bread denser which could cause gumminess in the center or bottom due to underbaking. My best advice is to use the window test for done-ness. Test it at 4 minutes, then knead one more minute at a time until you are able to stretch the dough and hold it up to the light so the light passes through without breaking the dough. Kneading time can vary greatly by machine and by hand depending on the technique, but the test will yield consistent results.
Do you use a thermometer to check the internal temperature after baking? That should also help with the gumminess. It took me a few trials to get the texture I was going for and it's even lighter than the photos at this point since I've had a lot more practice 🙂
Mandy Lygrisse says
This is a wonderful recipe! I am struggling to get a less dense dough. The proofing time is much longer for me, I am going to try over night and see if that creates a “fluffier” finish. Any other suggestions??
Jamie says
I'm so glad you're enjoying the recipe—thank you for the kind words! I found that getting the kneading time just right makes a big difference in achieving a light loaf with a good rise, but it took a few tries to really get the feel for it.
An overnight proof is a great idea for a fluffier texture. You might also try a touch more water (I'd try a tablespoon at most to start), especially if you're in a dry climate. Let me know how it goes—I’d love to hear!
Molly says
I just tried this recipe, but am worried I did something wrong. The dough was so sticky (the entire time) that it was extremely difficult to knead. I tried for 25 mins and then gave up and am proofing it now. What do you think I did wrong? I really hope it comes out ok! It looks like delicious bread, and I was excited to be able to knead bread again. Any pointers would be most welcome! Thank you!
Jamie says
Hi Molly- Thank you for the detailed comment. Which gluten-free flour did you use? Did you measure the flour by weight or by volume? It's most accurate to weigh by volume. Adding a little more flour would be your best bet. I would measure out an amount first (about 2 tablespoons) and add it generously as you knead to keep the surface and your hands well floured. Measuring the flour ahead of time will help you adjust the recipe next time, so you know exactly how much more flour you need. You can use more than 2 tablespoons too, but it's a good amount to start with since sometimes a little goes a long way.
Sometimes breads need a little more flour if baking in a humid environment since the flour can absorb moisture from the air.
Lightly oiling your hands can help with the stickiness as well, but it sounds like your dough needs a little flour:water ratio adjustment first.
Molly says
Hi Jamie
Thank you for your response and the ideas for next time. I used the King Arthur 1 to 1 flour blend, and I did weigh it out. Should I have also weighed out the water? I used a measuring cup for liquids and measured the water as exactly as I could, but yes I definitely think the water to flour ratio was off. It was way too sticky and I shudder to think how much flour I used to knead it, lol. The loaf came out pretty dense but still edible, so that's good!
Essie says
I'd like to try to make this to give a friend, but i can't do the kneading with my damaged hands. Can I use my mixer and dough hook? Do you have a recommendation how long to run the dough hook?
Jamie says
Hi Essie, I unfortunately have not tried it myself so I can't be sure if a dough hook would work. It does knead very similarly to regular bread dough, so if it works on regular gluten bread it will *probably* work here. Have you seen my gluten-free no knead bread recipe?
Jess says
This was a fun recipe to try!! Besides a delicious bread, your recipe, instructions and video made me feel like I was in a private cooking class! Thank you!!!
Jamie says
Aww thanks Jess! Your review made my day 🙂
Patrick says
Anyone else here from the Facebook support group? I tried it and it is amazing! Just like regular bread, this gluten free artisan bread takes a couple hours with rising time so I may not make it every week but I WILL make it any week I can. I’m going to try the gluten free Irish soda bread that’s linked here when I don’t have time for this one. Just try it! It’s life changing.
Elli says
This quite literally fulfills *everything* I’ve been missing from gluten free bread. It rises, uses one regular flour that I can buy from the store (instead of special ones or a diy mix), it’s crusty, has the perfect inner texture, lasts a few days, and doesn’t have giant holes. It is a miracle. Thank you for introducing me to psyllium husk powder and this easy gf Bread recipe !
Brooke says
I literally cried while teaching my celiac daughter how to knead this gluten free artisan bread dough. She’s 7 and all her friends are making sourdough with their mums and I didn’t think I’d get the chance to teach her and have her feel included. We love the bread too
Barbara H says
This gluten-free artisan bread is really simple and tastes authentic! It’s the best gluten-free bread I’ve made. I really enjoyed kneading bread again. I haven’t seen another recipe quite like this, and I am so glad you took the time to figure out a kneadable dough. Thank you Jamie!
Laura Hazelton says
My bread loaf came out doughy in the middle. I still ate it but it was so chewy and looked not done but I did all the recipe said. And I’m worried the inside wasn’t cooked enough.
Jamie says
Hi Laura - Did you measure the internal temperature to check for doneness? That's the best way to make sure the loaf is cooked through. Also, cutting into it before it's mostly cooled can cause it to seem a bit doughy at first.