
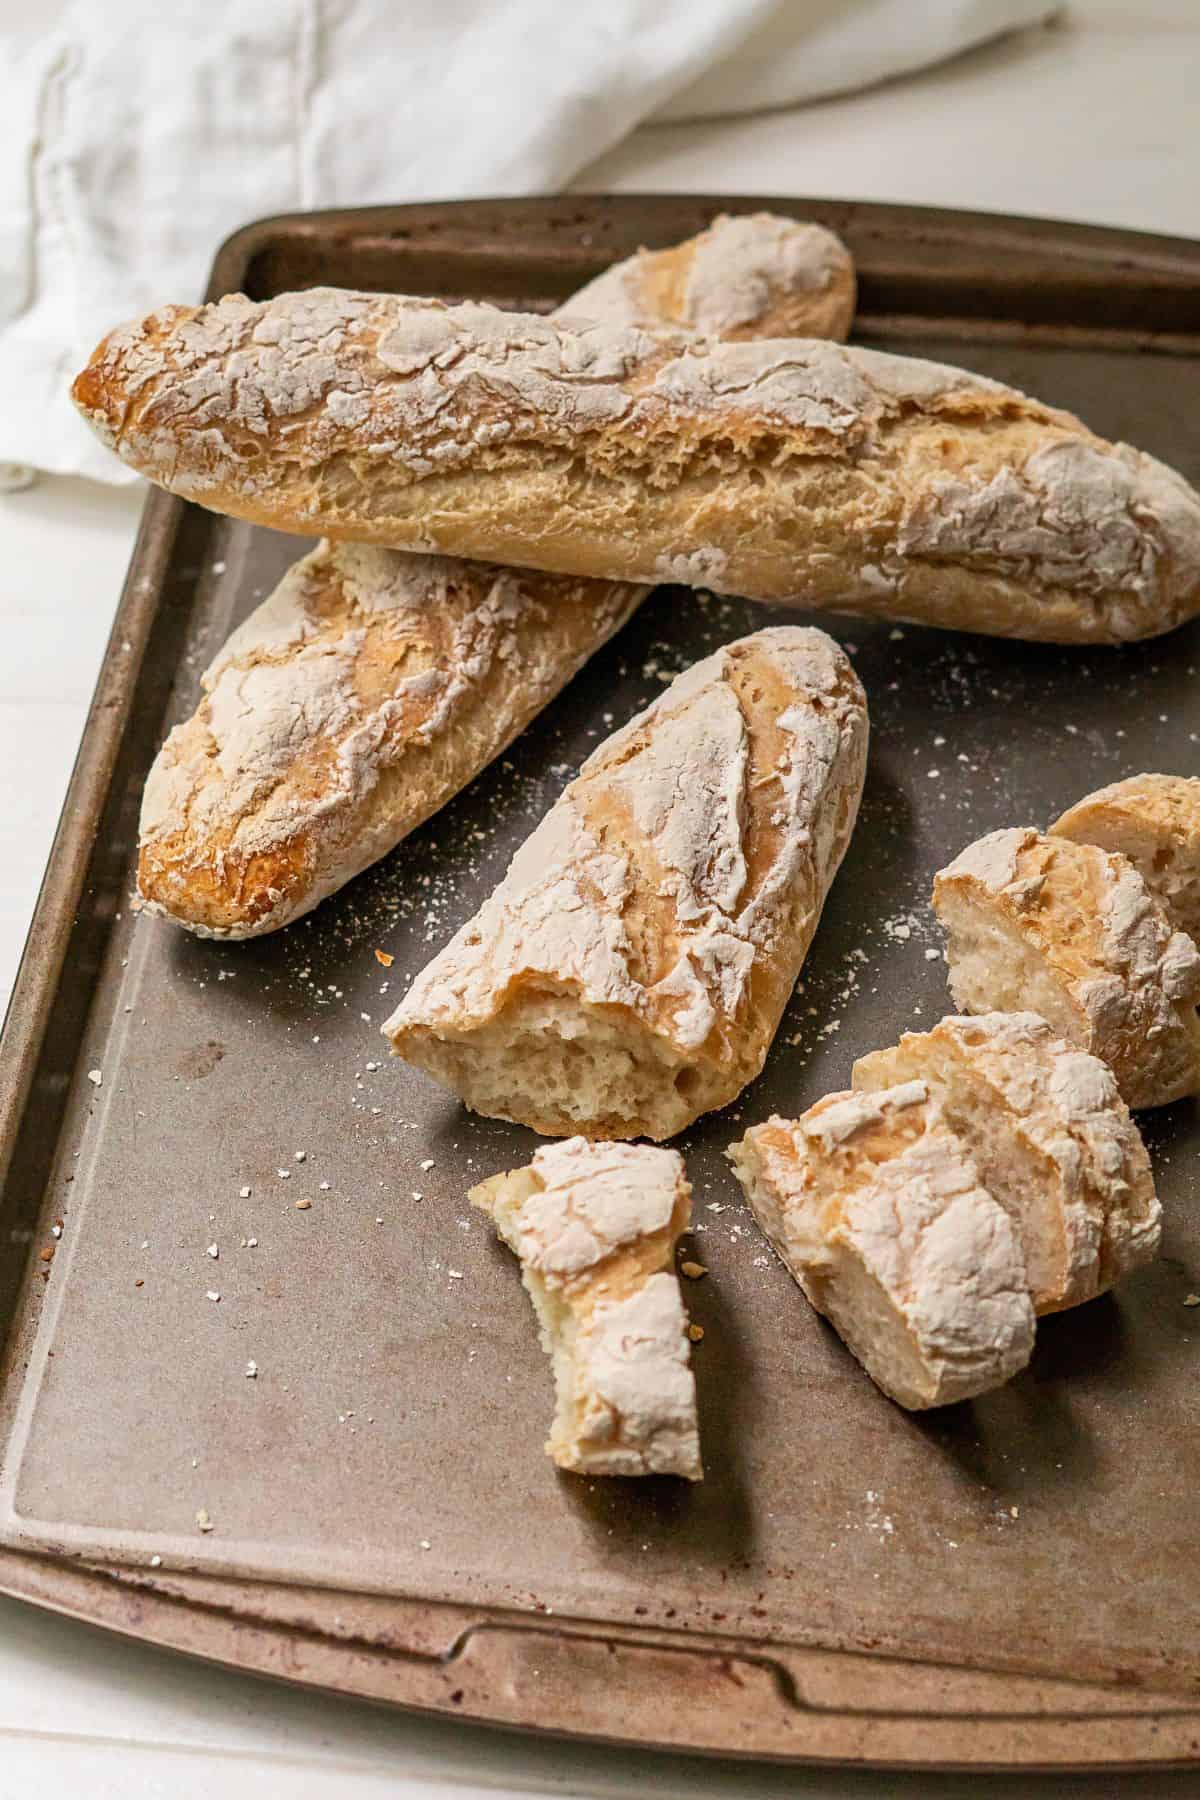
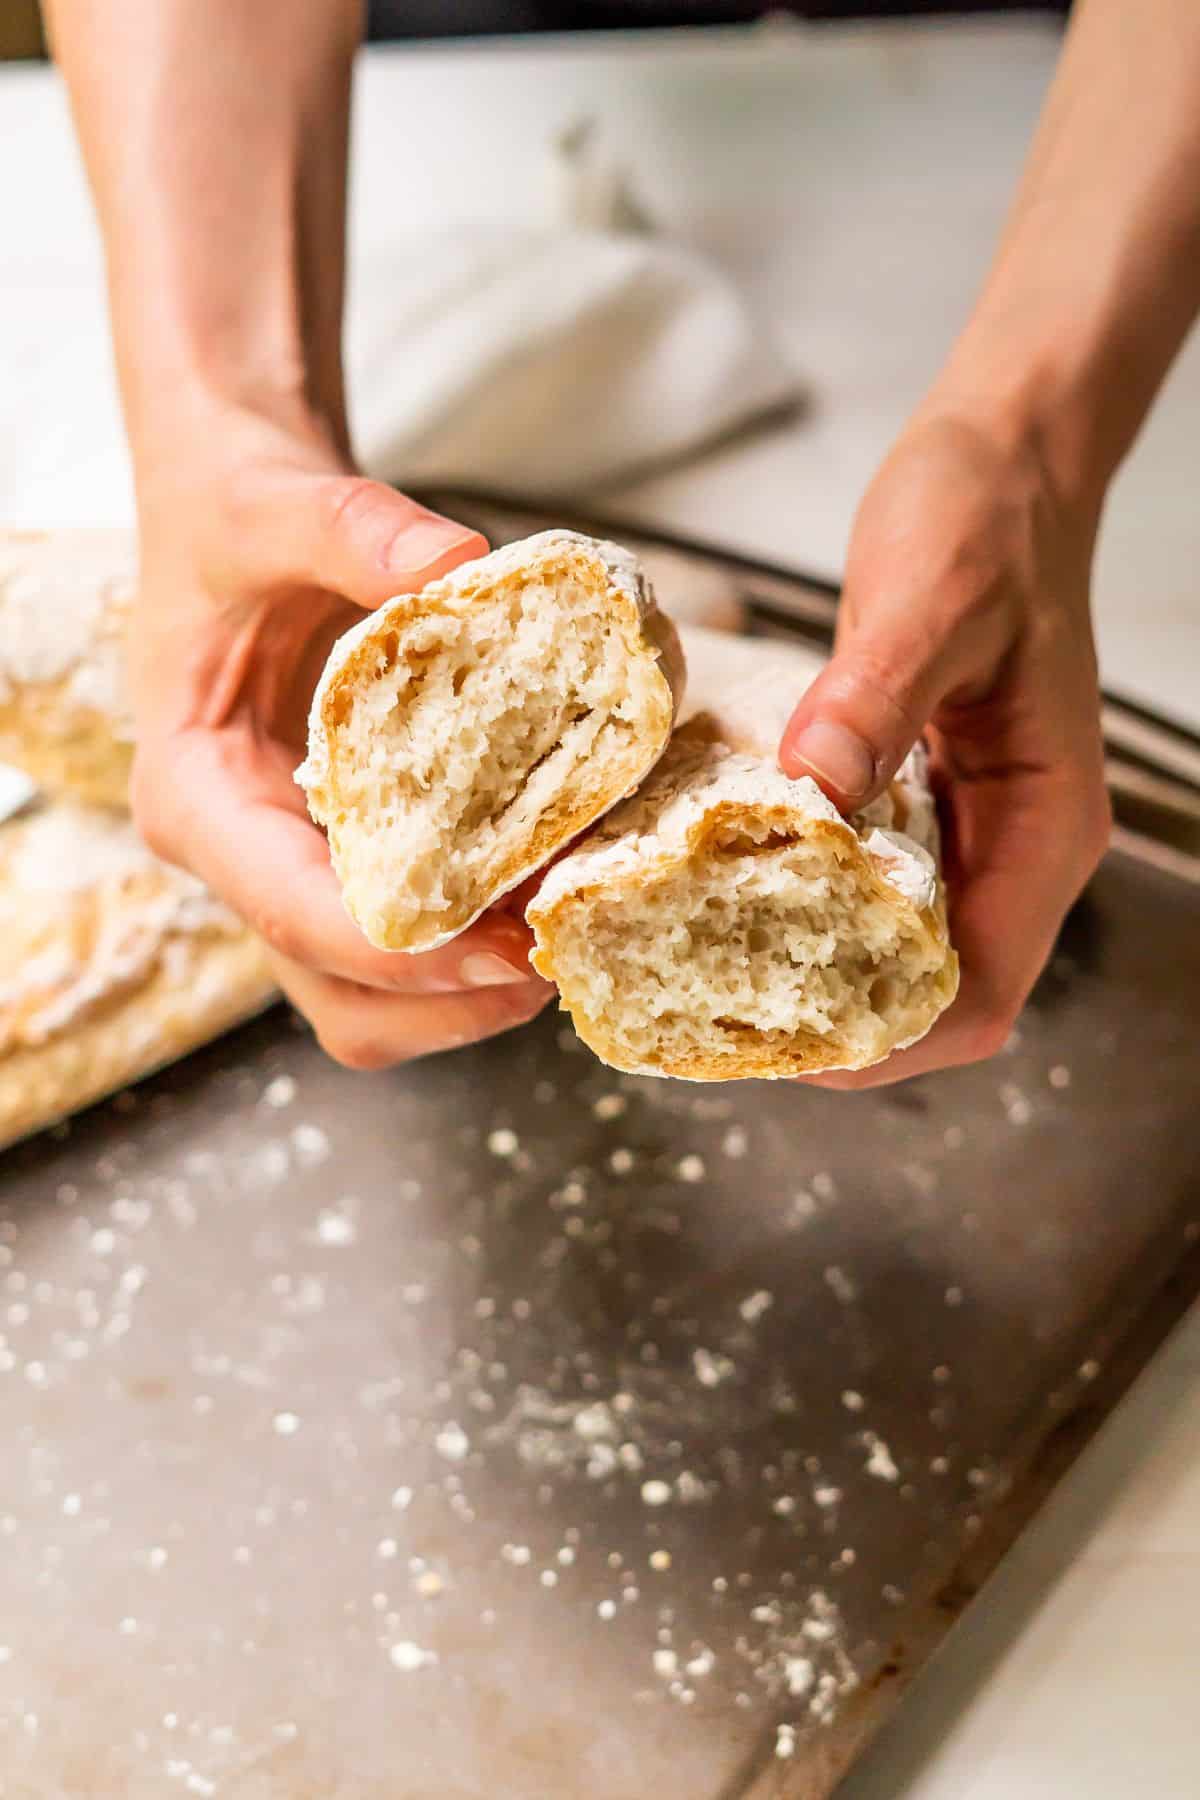
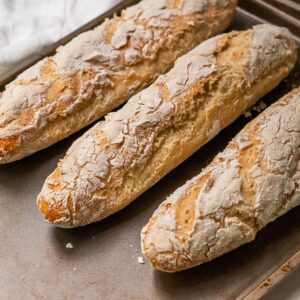
These Gluten-Free French Baguettes are surprisingly easy to make, with just three ingredients and a simple no-knead method. They bake up soft on the inside and crusty on the outside, with a golden exterior that feels bakery-worthy without the effort.
If you've ever assumed baguettes were off-limits on a gluten-free diet, this recipe will change your mind!
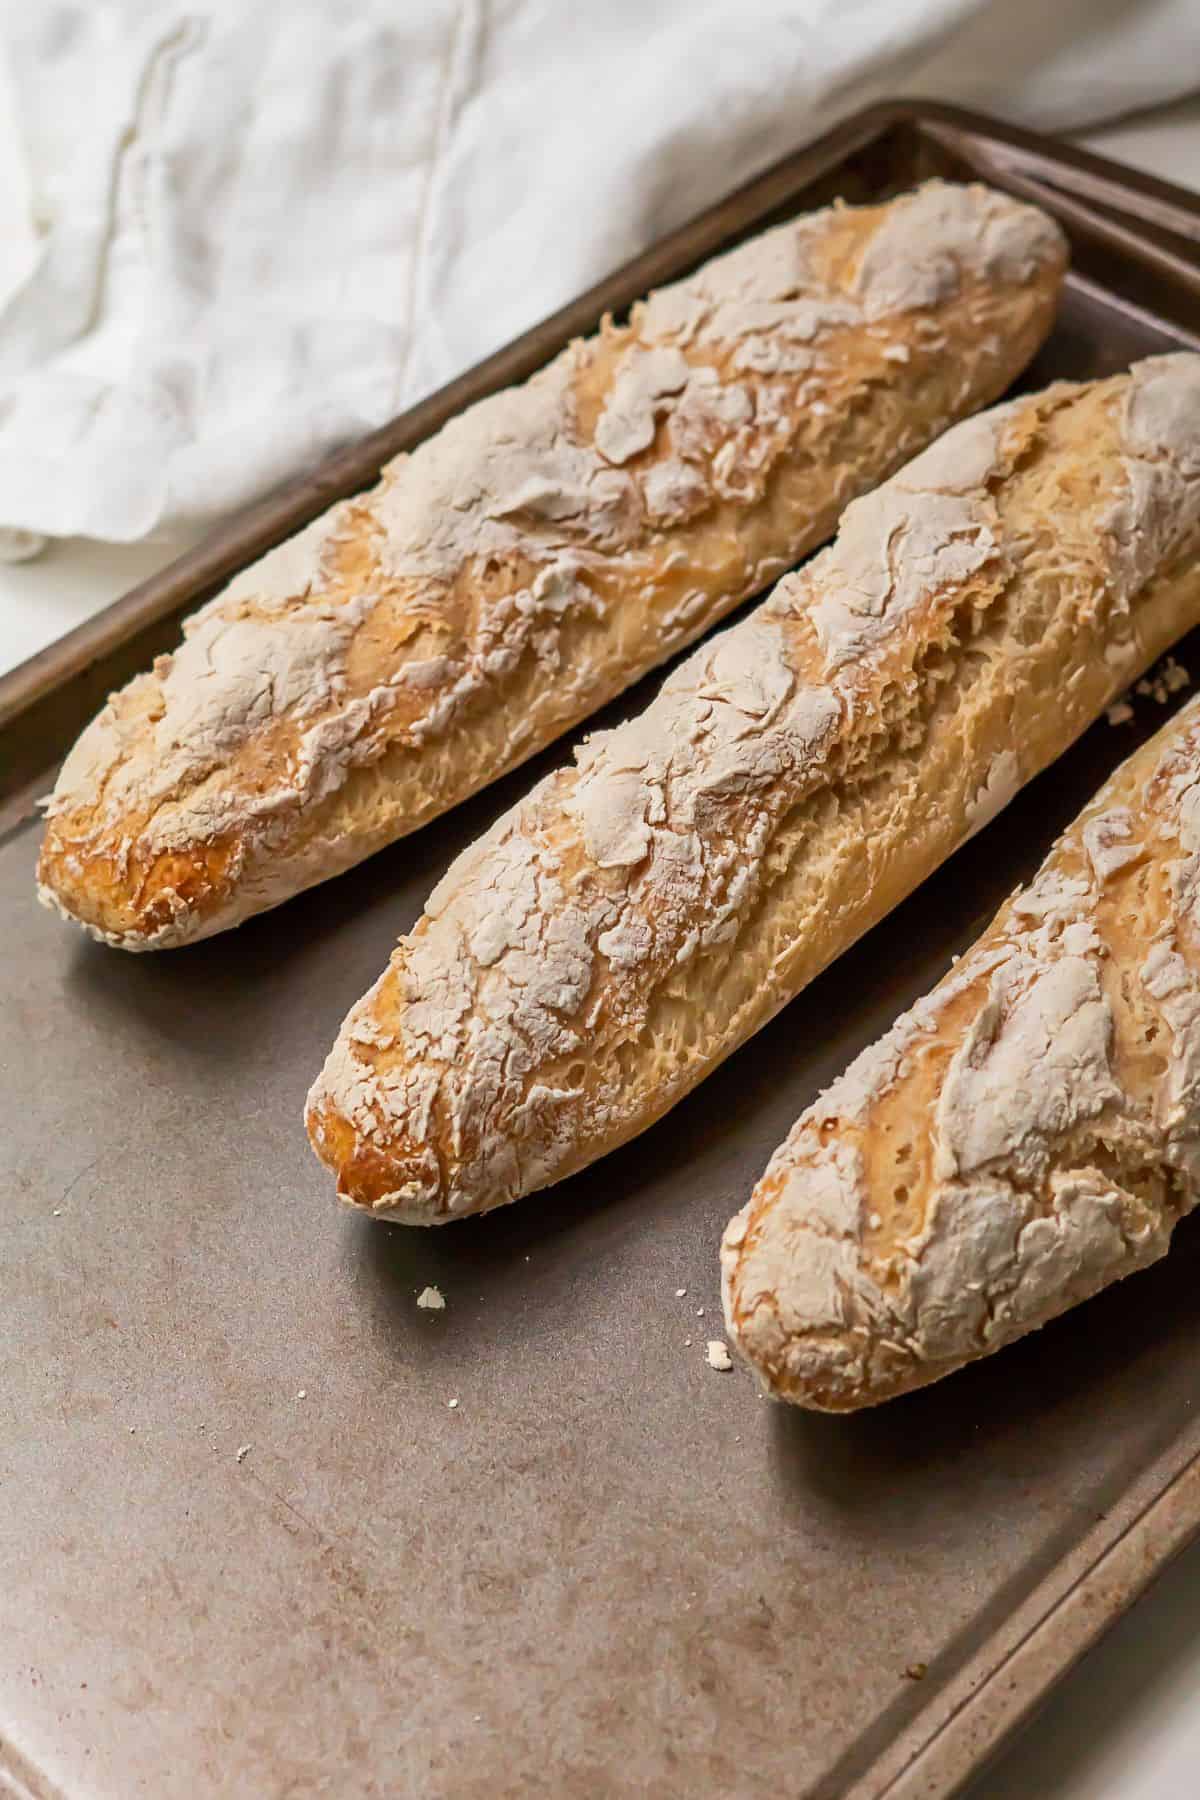
Because gluten-free dough rises outward instead of upward, an affordable baguette mold is essential so the loaves bake into their classic shape. Don't trust the non-gluten-free recipes that claim gluten-free flours "will work" with GF flour -- this mold and method is the easiest way to get a true baguette shape and golden crust at home.
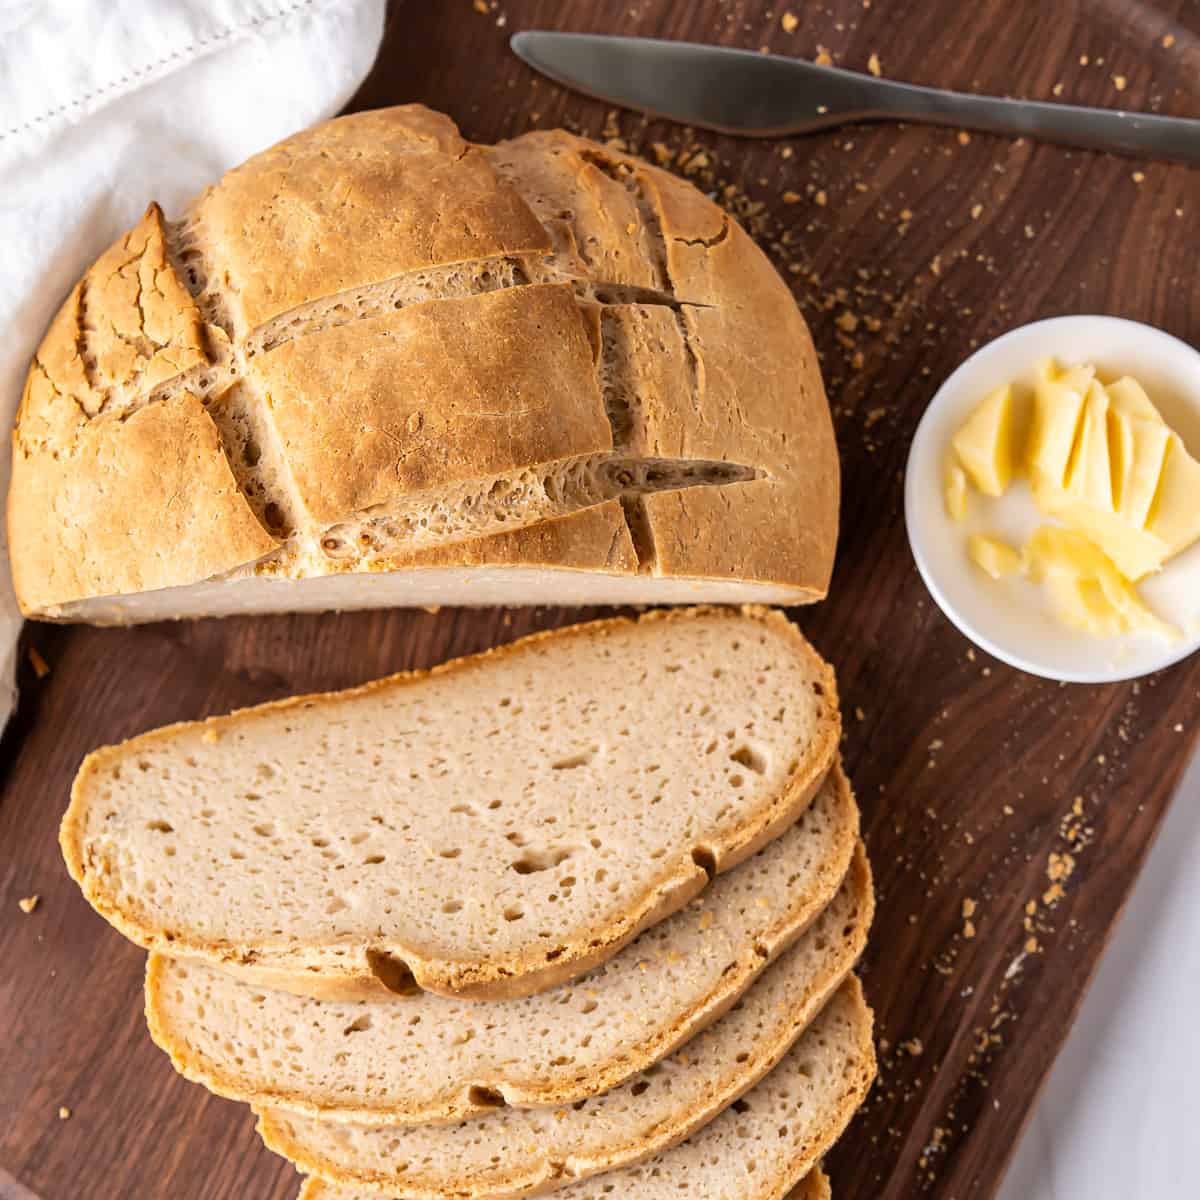
These gluten-free baguettes are perfect year-round. Serve them with dinner, use for sandwiches, take on picnics, or enjoy with butter or jam or alongside a Thick Hot Chocolate for breakfast! Lately, I've been pairing them with cozy winter meals like soup nights and simple dinners, where slow baking like this feels just especially comforting.
Pair it with my Easy Paella Recipe, Thai Chicken Soup, Baked Salmon Cakes, Savory Pumpkin Stew, Italian Minestrone Soup, Dairy Free Shrimp Scampi, or Sautéed Peppers and Onions.
For more soups to serve it with, check out my Dairy-Free Zuppa Toscana, Root Vegetable Soup, Gluten-Free Chili, or browse my gluten-free soup category.
For more gluten-free bread recipes, check out my Gluten-Free Irish Soda Bread, Simple Gluten-Free Artisan Bread, Gluten-Free White Sandwich Bread, and No Knead Gluten-Free Bread.

How to make it (with photos)
Ingredient Notes + Substitutions
This gluten-free french baguette recipe is incredible because it uses only 3 common ingredients, just like true french baguettes!
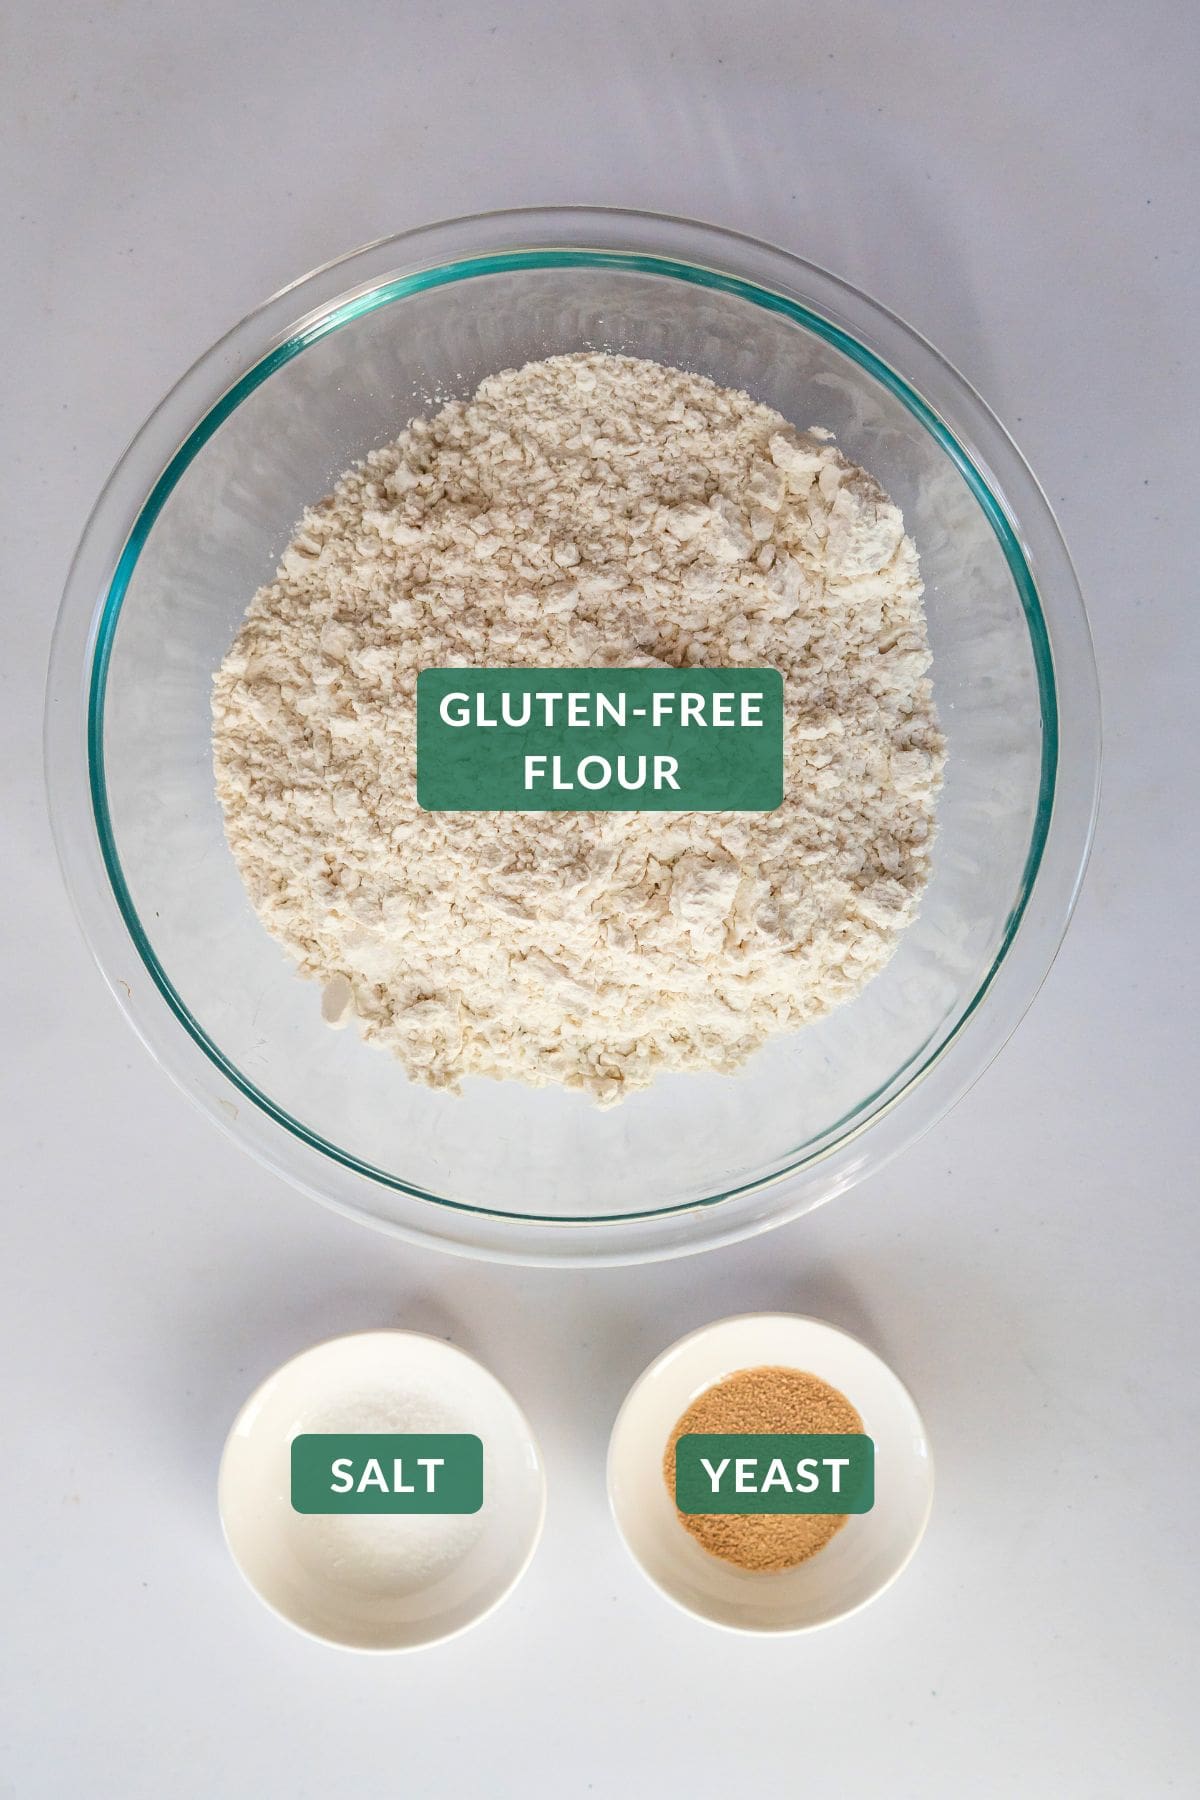
All Purpose Gluten-Free Flour
Choose a gluten-free flour blend with xanthan gum or guar gum. These gums replace gluten and help hold a loaf shape in gluten-free bread. I like Bob's Red Mill Gluten-Free 1-to-1 Baking Flour and Pamela's All Purpose Gluten-free Flour for this recipe.
These blends are usually a combination of gluten-free grain flours that include white rice flour or brown rice flour, along with millet, sorghum, and buckwheat flours. There are also usually starches such as potato starch or cornstarch to keep the flour light.
Yeast
You cannot get a true baguette flavor without yeast! I promise that with this no-knead recipe, it will also be no fuss. However, if you prefer bread with baking soda, check out my Gluten-Free Irish Soda Bread.
Is dry yeast gluten-free?
Dry yeast is naturally gluten-free. However, some brands add starch to the final product to prevent clumping. Always check the ingredients list for additives or stick to a known gluten-free yeast brand, like Red Star Active Dry Yeast.
Salt
Without salt, bread is simply flour and yeast. Perhaps salt's most important role is making bread flavorful and delicious! Of course, we include it in this recipe.
Lukewarm Water
You will not find any milk or eggs in this recipe. While many gluten-free bread recipes include dairy milk, traditional baguettes are made with four simple ingredients: flour, yeast, water, and salt.
The French are known to delight in simple pleasures, and I am far from making complicated changes to traditional perfection.
Psyllium Husk Fiber
While my Gluten-Free Artisan Bread and Gluten-Free Sandwich Bread use psyllium husk powder, this recipe does not. The baguette mold guides the rise needed to make a traditional baguette shape, rather than the addition of psyllium husk that causes gut issues for some people.
I'm currently working an a variation that includes this ingredient for those of you who like to use it and don't want to purchase a baguette pan. Stay tuned!
Equipment
To get a proper gluten-free baguette shape without psyllium husk, you will need to use a mold. This is because gluten is responsible for holding bread together so the bread can rise upwards.
In gluten-free bread, you replace gluten with xanthan or guar gum. These gums serve a similar purpose but are not as strong as gluten. You need a baguette mold to encourage vertical rise from the outside.
After a lot of research, I finally settled on this affordable silicon baguette pan. I highly recommend it, and this recipe will make the exact amount of dough needed to fill it.
If you'd like to make gluten-free yeasted bread without a mold, I recommend checking out my Gluten-Free Artisan Bread recipe.
Step-by-Step Instructions
These gluten-free baguettes are easy and beginner-friendly, with just 6 simple steps.
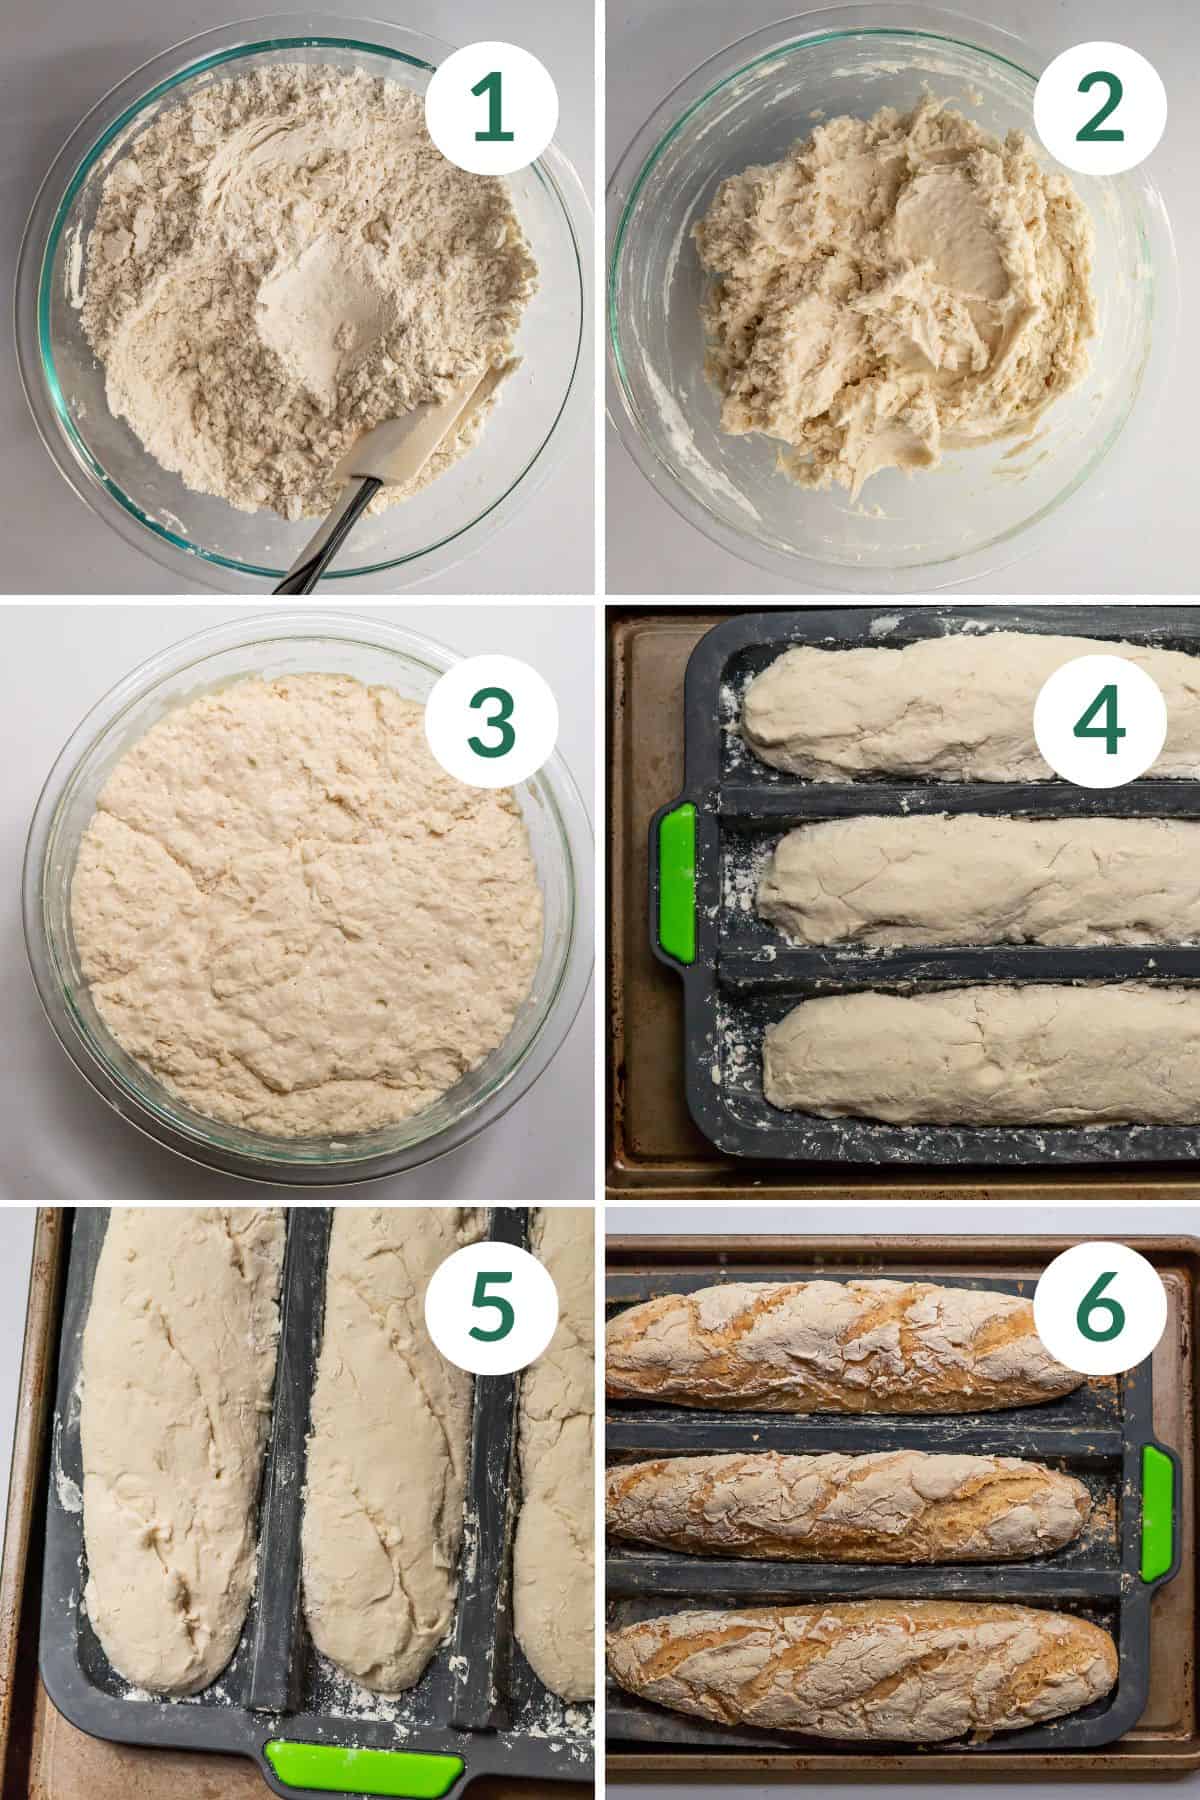
- Dry Ingredients: In a large mixing bowl, thoroughly mix gluten-free flour, yeast, and salt with a whisk.
- Water: Add lukewarm water in ¼-½ cup increments, stirring with a wooden spoon between increments.
- First Rise: Cover with plastic wrap or equivalent and let rise undisturbed for 8-20 hours in a warm location (I usually do overnight by the window in summer, or on the kitchen counter).
- Form Baguettes and second rise: Generously flour your hands and the silicon baking mold. Keep extra flour nearby to re-coat your hands whenever the dough gets sticky. Using your hands, shape the dough into three baguettes of equal size in the silicon mold.* Set the mold on a baking sheet to stabilize. Cover with a towel and allow to rise for 1 ½ to 2 hours.
- Score: Preheat oven to 450 degrees F. Using a sharp paring knife or kitchen scissors, score the baguettes.
- Bake: Place an oven-safe bowl or deep pan filled with two boiling cups of water on a lower rack in the oven. Place the tray of baguettes on the upper shelf and bake for 10 minutes. Remove the water bath and bake for 30-40 minutes more or until the crust is thick and browning.
Expert Tips
Get perfect gluten-free french baguettes on the first try with these expert tips!
Pick a good all purpose gluten-free flour.
Make sure that your gluten-free flour includes xanthan or guar gum. I recommend Bob's Red Mill 1-to-1 Gluten-Free Baking Flour or Pamela's All Purpose Gluten Free Flour.
If your blend does not include guar gum or xanthan gum, add ¼ teaspoon xanthan gum per cup of flour. That's 1 teaspoon for a single batch of this recipe.
Let it rise.
This recipe requires two rises. The first is for 8-20 hours (usually overnight) just after mixing the dough.
The second is after the bread is formed (and before scoring) for 1-2 hours. If you cut the rise time short, your baguette will be more dense.
I realize that it's more common to have a single shorter rise time for gluten-free bread. However, true French baguettes have a rise time of 20-24 hours (usually overnight) which is what gives them a distinctive fermented yeasty flavor.
These gluten-free baguettes are made exactly like traditional french baguettes, as they should be.
Bake with a water bath.
This is a super fun trick I'll be using for all my future crusty bread recipes! Pour two cups of boiling water in an oven-safe bowl or a deep pan.
Make sure there are two racks in the oven. The water bath goes on the lower rack, with the bread loaves on the upper rack. Then you bake for 10 minutes before removing the water bath.
Don't open the oven.
Other than removing the water bath, keep the oven closed for the duration of baking. Releasing heat too soon can prevent the bread from rising or forming a tough crust. You can use the oven light to check on progress.
Let parts of the crust get nice and brown.
I recommend baking past golden brown, when you notice a nice browning crust. This yields the best inner and outer texture.
Troubleshooting - why is my baguette not crispy?
Baking at a high temperature for at least 40 minutes is the most important step for making a french baguette crispy.
Adding a water bath of 2 cups of boiling water in a bowl or pan on a rack below the bread for the first 10 minutes of baking will also encourage a crispy crust.
Here are some reasons why your baguette may not be crispy:
- You did not bake it long enough. Golden-brown is not enough for a crispy baguette crust. You want the bread to have some areas that are a solid medium brown, indicating that it is crisp and baked through.
- You didn't wait for the oven to preheat. For any baked good that needs to rise, the first 5 to 10 minutes of baking are crucial. If you put your bread in while preheating, you get a soft crust and dense texture.
- You didn't include a water bath while baking. According to Lifehacker, the water bath "helps dissolve sugars on the surface of the dough that caramelize during baking and give you a glossy, crisp crust." Place two cups of boiling water in an oven-safe bowl or deep pan. Then set it on the rack below your bread for the first 10 minutes of baking.
Recipe FAQs
Here I answered some frequently asked questions about this gluten-free french baguette recipe. Don't see your question? Leave it in the comments at the end of this post and I'll answer within two business days.
Store leftovers on the counter for up to 3 days, wrapped in a cotton dishtowel. You can also freeze the baguettes for up to 3 months. Allow to cool and wrap in plastic or slice into a ziploc bag before freezing. Reheat frozen baguettes in the oven at 400 degrees F until heated through (about 5-10 minutes).
The French love to layer butter or jam on their baguettes, and rarely eat the bread plain by itself. Other delightful accompaniments include butter with a thin slice of ham, cheese, chocolate spread like Nutella, and honey.
French bread is also commonly used to wipe the plate clean at the end of a meal.
This is true and not true. Gluten-free bread usually only needs a single rise. However, with the dough fluffiness created by the long rise time needed to get that authentic fermented baguette flavor, this gluten-free baguette would not hold its structure. Therefore it needs to be reshaped and have a second rise for best taste and texture.
Traditional authentic french baguettes in France always have a long rise time of 20-24 hours. This is absolutely necessary for that fermented yeast flavor.
Related gluten-free bread recipes to consider...
Looking for more delicious gluten-free bread recipes like this gluten-free french baguette recipe? Check these out:


Love this recipe? Please leave a 5-star 🌟🌟🌟🌟🌟 rating in the comment field or recipe card below. Thank you!
📖 Recipe
Gluten-Free French Baguette
Ingredients
- 4 cups gluten-free flour** (I used Pamela's All-Purpose Gluten-Free Flour, 500 grams)
- 1 ½ teaspoons active dry yeast
- 2 ¼ cup lukewarm water
- 1 teaspoon salt
Instructions
- Dry Ingredients: In a large mixing bowl, thoroughly mix gluten-free flour, yeast, and salt with a whisk.4 cups gluten-free flour** , 1 ½ teaspoons active dry yeast, 1 teaspoon salt
- Water: Add lukewarm water in ¼-½ cup increments, stirring with a wooden spoon between increments.2 ¼ cup lukewarm water
- First Rise: Cover with plastic wrap or equivalent and let rise undisturbed for 8-20 hours in a warm location (I usually do overnight by the window in summer, or on the kitchen counter).
- Form Baguettes and second rise: Generously flour your hands and the silicon baking mold. Keep extra flour nearby to re-coat your hands whenever the dough gets sticky. Using your hands, shape the dough into three baguettes of equal size in the silicon mold.* Set the mold on a baking sheet to stabilize. Cover with a towel and allow to rise for 1 ½ to 2 hours.
- Score: Preheat oven to 450 degrees F. Using a sharp paring knife or kitchen scissors, score the baguettes.
- Bake: Place an oven-safe bowl or deep pan filled with two boiling cups of water on a lower rack in the oven. Place the tray of baguettes on the upper shelf and bake for 10 minutes. Remove the water bath and bake for 30-40 minutes more or until the crust is thick and browning. The internal temperature should be between 205-210 degrees F, and is the best measure of doneness.
Notes
** All Purpose Gluten-Free Flours: I tried both Pamela's All-Purpose Gluten-Free Flour and Bob's Red Mill (BRM) 1-to-1 gluten-free flours and this recipe works great with both! The dough is a little more wet with Bob's Red Mill 1-to-1 and the final product is still excellent. Note that BRM GF flour says "Not recommended as a 1:1 substitute for yeasted recipes" on the packaging, but will work fine in this recipe. It works well with yeasted recipes in general, just not as a direct 1:1 substitution for non gluten-free bread recipes. Storage: Store leftover gluten-free french baguettes on the counter for up to 3 days, wrapped in a cotton dishtowel. You can also freeze the baguettes for up to 3 months. Allow to cool and wrap in plastic or slice into a ziploc bag before freezing. Reheat frozen baguettes in the oven at 400 degrees F until heated through (about 5-10 minutes).


Marissa says
1. Is the rise time for both the first rise and the second rise the same if you use instant/quick yeast versus active dry yeast?
2. If you’re using the Bob’s red mill gluten-free one to one flour is it still 500 g of flour or 4 cups spooning it into the measuring cup?
Jamie says
1. Yeast Type: If you're using instant (quick) yeast, the first rise will usually happen a bit faster than with active dry yeast. The second rise is typically about the same for both. For the second rise, you're looking for the dough to roughly double in size. It's best to go by how the dough looks, especially for gluten free doughs. For gluten-free baguettes, the first long rise is more about developing flavor so the time is more flexible.
2. For Bob's Red Mill, use 4 cups spooned and leveled. The dough will seem a little wetter than the photos at first, but it bakes up beautifully.
Marissa says
Thank you for the quick reply! My dough is on its first rise right now and I only did 500 grams of bobs red mill since I prepped the dough before you got back to me. It’s rising great so far! The bobs red mill package says 37 grams per quarter cup of flour which is almost 100 grams more flour than what was originally recommended, so I did the 500 g to try to be on the safe side. Hoping it works out! Tried to bake another loaf this morning with a different creator’s recipe and it turned out to be a hockey puck. This one seems way more promising!
Milly says
Pretty good! Definitely has that "GF" vibe but the flavor is good with butter! Very very crunchy exterior in the way GF bread is where it doesn't have that delicate crunch. It has more of a veneer-removal crunch. But I mean I have made a few GF breads and this one is solid for how simple and easy it is!
Jamie says
Thanks for sharing Milly!
MS CAROLE MCCALDIN says
Sorry, last word should have been batter!!!
MS CAROLE MCCALDIN says
Hi there, I'm a complete novice and would appreciate clearer recipe amounts ie is it 2 x 1/4 cups of water or is it 2 and a 1/4 cups of water. Sorry, if this appears stupid but the dough looks more like a battery 😁
Jamie says
It's 2 and 1/4 cups of water. It's entirely ok if it looks like a batter. It should be a thick batter though, like a drop biscuit or a thick pancake batter. If using Bob's Red Mill 1-to-1, the batter is often a bit softer than the photos (which were taken during a trial with Pamela's All Purpose Gluten-Free Flour). You can add 1/4 cup extra flour if you think the dough/batter is even more runny than the thicker batters I described, but I wouldn't add any more than that.
No matter the texture, I recommend that you still bake it. The "foolproof" is in the title of this recipe because I've added a little extra gluten-free flour, a little less, a little more water, and it miraculously always turns out fine.
Elaine says
I have not tried this yet, but can herbs be added to this ??
Jamie says
Hi Elaine - I haven't tried adding herbs myself but I think it should work well. Let us know how it goes if you can!
Sandra K says
Have made this GF French baguette recipe twice... both times the baguettes habe turmed out well!! Crispy, brown crust, light airy crumb, lovely yeasty aroma, and absolutely delicious with butter right out of the oven. It does not last more than 2 days!
Gina says
I have the silicone mold pan and am curious if I bake directly in it and if so, do I need to put it on a cookie sheet? Also, how long would I let them cool before taking out of the molds.
Thanks!
Jamie says
Hi Gina! Definitely place the silicone mold on top of a metal baking sheet since it's too floppy otherwise. If you let them cool completely, the inside stays moist for longer. But if you're enjoying them hot and fresh, I'd let them cool for at least 15 minutes and then cut with caution because they are still steamy. Enjoy!
Donna Fox says
Can I bake the bread in an Emile Henry Baguette Baker?
Jamie says
Hi Donna! I think it would work very well since it has a nice shape. However, since I haven't used one myself yet, I'm not sure how it would affect the baking times. Please let us know if you try it!
K says
These look great! Is it possible to freeze the leftovers? Thank you for this recipe - I can’t wait to try it!
Jamie says
Hi K - I haven't tried freezing them yet so I'm not sure. My family usually tears through all three gluten-free baguettes within the first two days! I'll give it a try when I make them again. Let us know if you try it first!
Ang says
It's a 10 out of 10. Delicious and was so easy to make. I let it rest for 20h the first round then 2 h the second time.. it will be my go to recepie from now.
Jamie says
I'm so happy to hear it Ang! Thank you for sharing!
Maureen says
I am so curious to try this, I have never seen such a long first rise for a yeasted bread. Would love to understand the science.
Jamie says
It's not uncommon to let traditional baguettes rise for a very long time (often over 10 hours). With additional rising time, the fermentation caused by the yeast gives a more acidic, tangier flavor that is traditional for french baguettes. With the gluten-free baguettes, I found that they took even longer to rise and impart that flavor.
The long rise is definitely not the case for most bread types! If you're looking for a more traditional gluten-free bread recipe (that's not a baguette), my gluten-free artisan bread has a shorter rise time.
Kevin says
A solid gluten free baguette recipe. They were crispy on the outside and soft on the inside.
Jamie says
Thank you for sharing your experience!
Lura says
I’ve made these gluten free baguettes several times with different gluten free flours and it works great every time! Thank you for the recipe.
Jamie says
I appreciate it Lura <3
Margaret Clegg says
Have you tried it with King Arthur's Measure for Measure? (NOT the new bread flour.)
Jamie says
I have not tried this recipe with King Arthur's Measure for Measure. I did try it with both Bob's Red Mill 1-to-1 (blue bag) and Pamela's GF Artisan Flour and it works well with both. King Arthur's blend has very similar ingredients to Bob's Red Mill, so I suspect it will work fine but can't confirm from experience. Please let us know how it goes if you try it.
Carleen says
Hi Jamie - I tried this for the first time and after an 8hr rise, the mixture is so runny! It’s has air bubbles on the top so I’m guessing the yeast is activating(?) but will it thicken up to rise? I used Bakels GF flour and Bakels yeast as I don’t have access to your suggested brands here in NZ. Any help is appreciated! Thank you 🌻
Jamie says
Hi Carleen - How runny is runny? Is it like cake batter or is it very wet but kind of holds shape? Ideally it should *sort of* hold a shape, but it is nothing like regular bread dough. Either way, I'd try baking it! If it's too runny for a baguette pan, you could put it in 2-3 standard loaf pans or even a square brownie pan and see what happens.
I tried a few different flours and sometimes would add an extra 1/4 cup for an ideal texture, but also tested the wetter batter and they still worked. So I'm hoping that's the case with yours!
I'm happy to help you troubleshoot more, either by writing in the comments here or feel free to email me at jamie at vibrantlygfree.com
Kaylen says
It is so refreshing to make a gluten-free baguette that tastes like the real thing! I love that you stuck with the traditional French style and just three ingredients. I’ll be making this many more times!
Jamie says
I'm so glad you loved it!
Daisy says
Shaping the dough was not possible, it was like a runny paste. I actually chuckled where it said “flour your hands when the dough gets sticky.” It’s nothing but sticky! Willing to accept if I did something wrong, but I just can’t see how this could possibly be shaped into something resembling a baguette.
Jamie says
Hi Daisy. I'm sorry to hear the texture didn't work out for you. It should be like a drop biscuit consistency. Which flour did you use? Did you bake it anyway? I've tried gluten-free flours where the texture has been pretty runny and the baguettes amazingly still turn out well.
Janice Underwood says
Hi hi ! is it possible to freeze the dough , if so how ? For how long ?
Jamie says
Hi Janice! I haven't tried freezing the dough for this recipe myself. However, yeasted bread dough can usually be frozen before either of the rising periods and then allowed to continue the cycle once thawed. Let me know if you try it out!
Bri says
I love this gluten-free baguette recipe. I made a new gluten-free friend and they were blown away by how easy this was. It was very fun to make it together!
Jamie says
Sounds wonderful! Thank you for sharing 🙂