Spoiler alert: Gluten-Free French Baguettes are not hard to make! In fact, they have only three ingredients and don't require much hands-on time at all (this recipe is no-knead). They are soft on the inside and crusty on the outside. Plus, I share a trick for getting that golden crust you've grown to love.
I linked the best super-affordable baguette mold to make up for the fact that gluten-free flour rises horizontally (rather than vertically). Don't trust the non-gluten-free recipes that claim gluten-free flours “will work too”. This is what you really need to get the perfect gluten-free baguette!
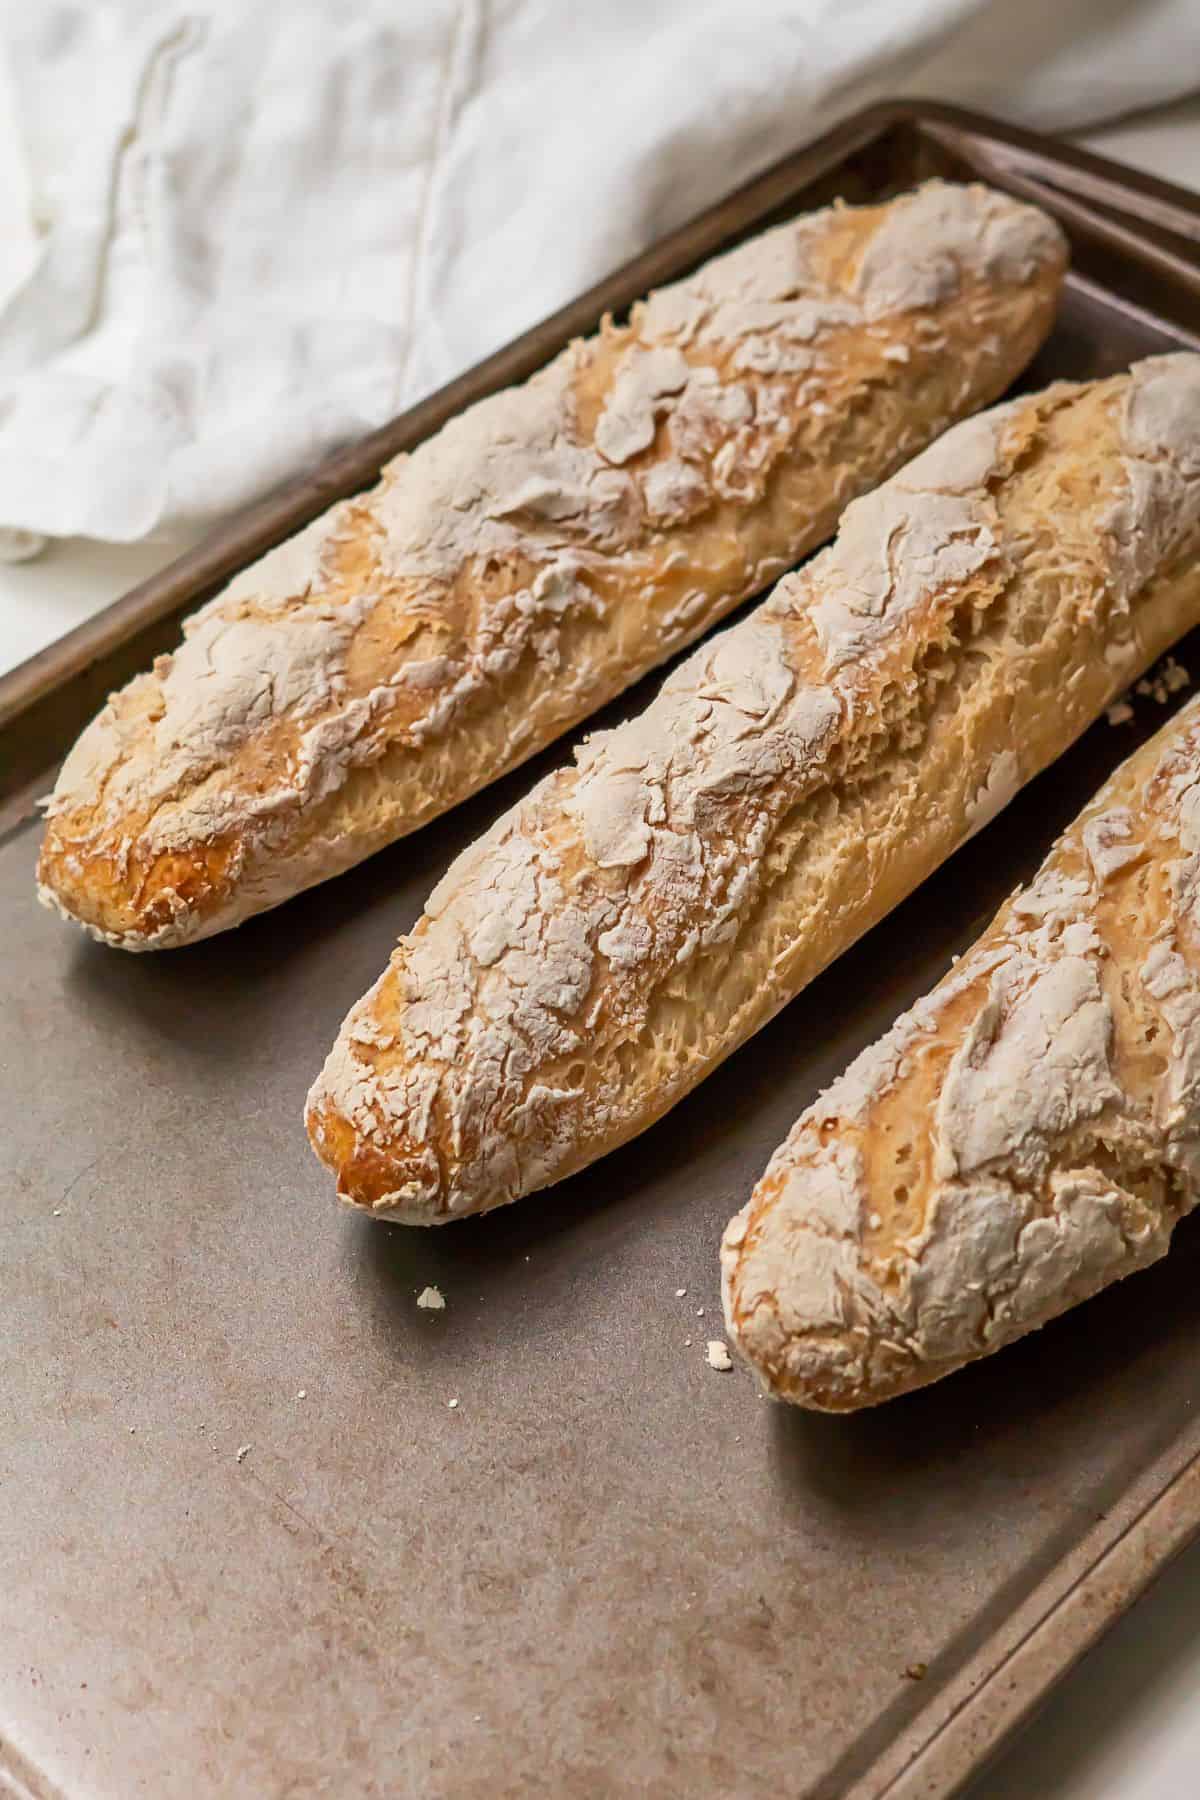
These incredible gluten-free baguettes are perfect year round to serve with dinner, use for sandwiches, take on picnics, or eat with butter or jam for breakfast!
I love to serve them alongside my Easy Paella Recipe, Healthy Minestrone Soup, Dairy Free Shrimp Scampi, Healthy Zuppa Toscana, and Sautéed Peppers and Onions.
For more gluten-free bread recipes, check out my Gluten-Free Irish Soda Bread, Simple Gluten-Free Artisan Bread, Gluten-Free White Sandwich Bread, and No Knead Gluten-Free Bread.
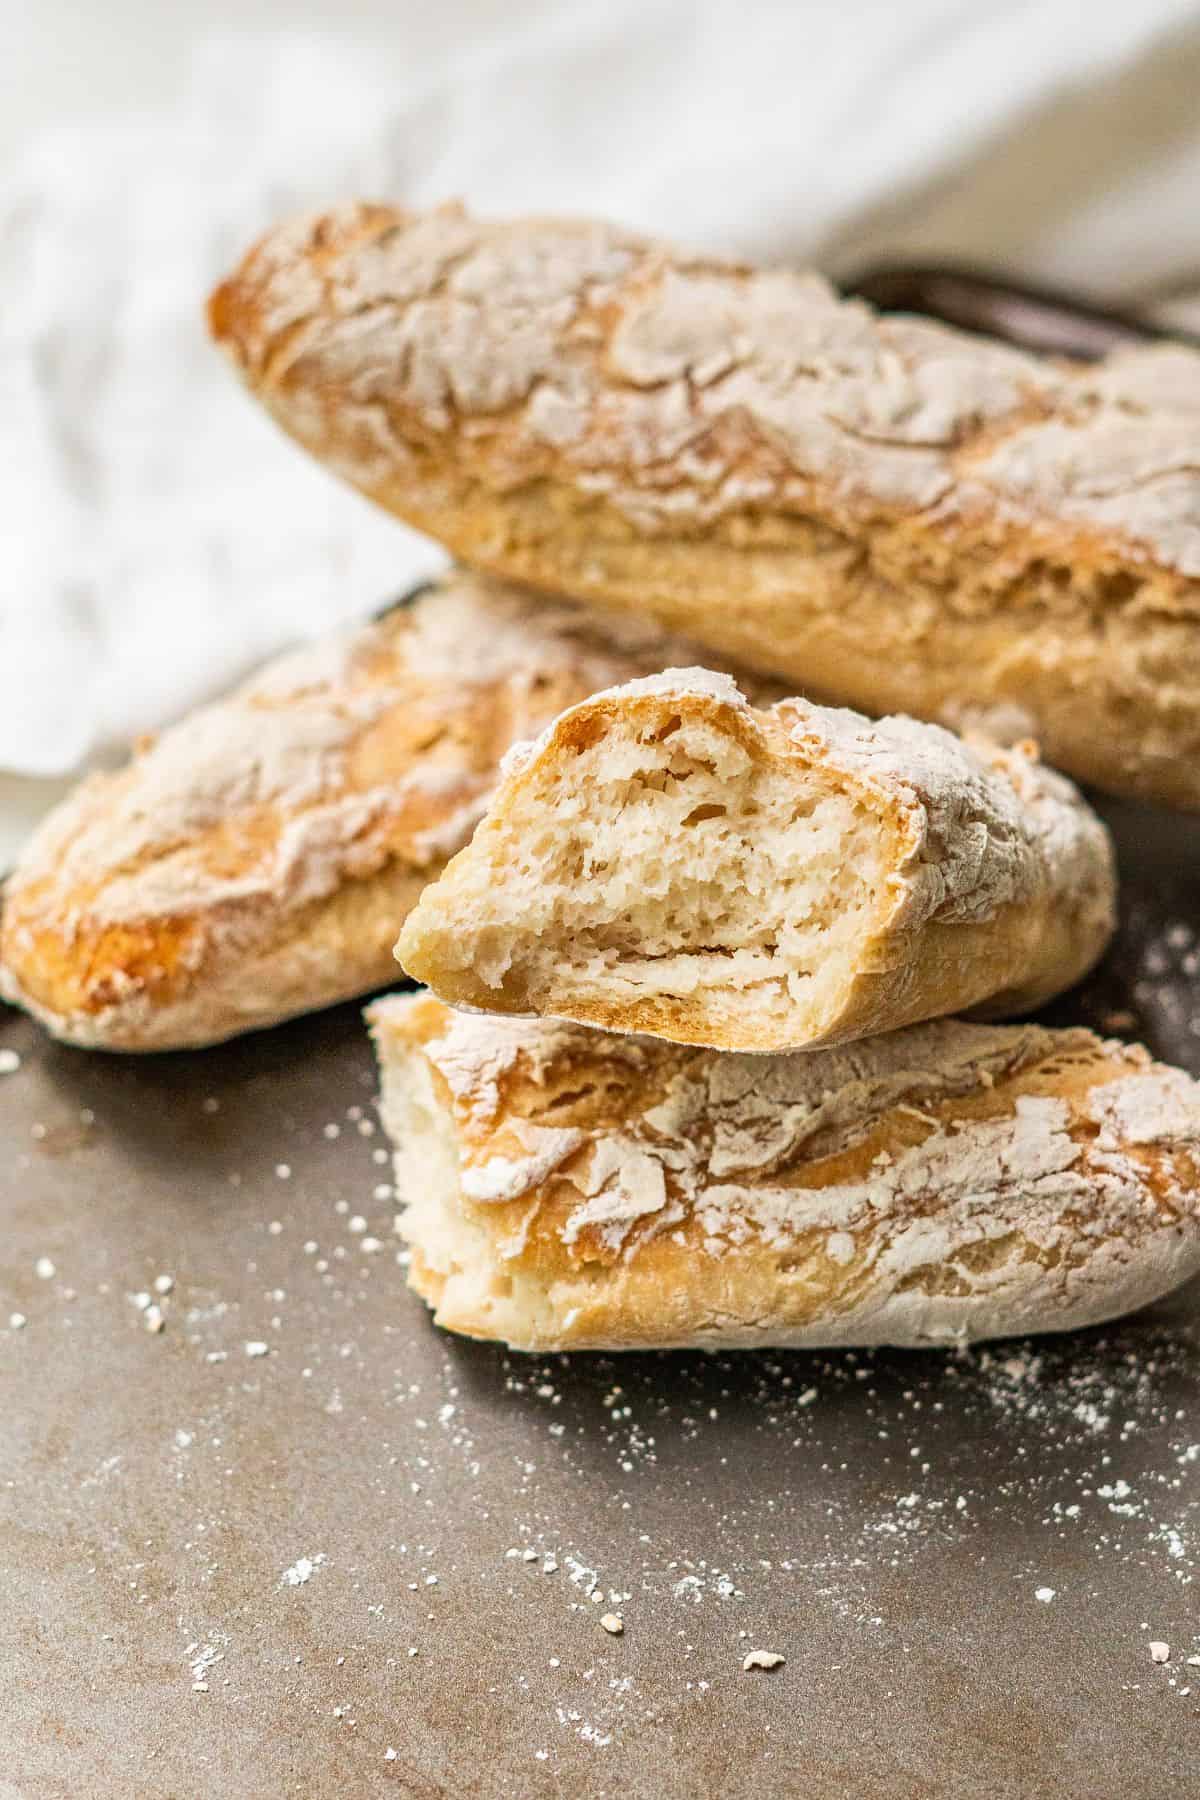
How to make it (with photos)
Ingredients Notes + Substitutions
This gluten-free french baguette recipe is incredible because it uses only 3 common ingredients, just like true french baguettes!
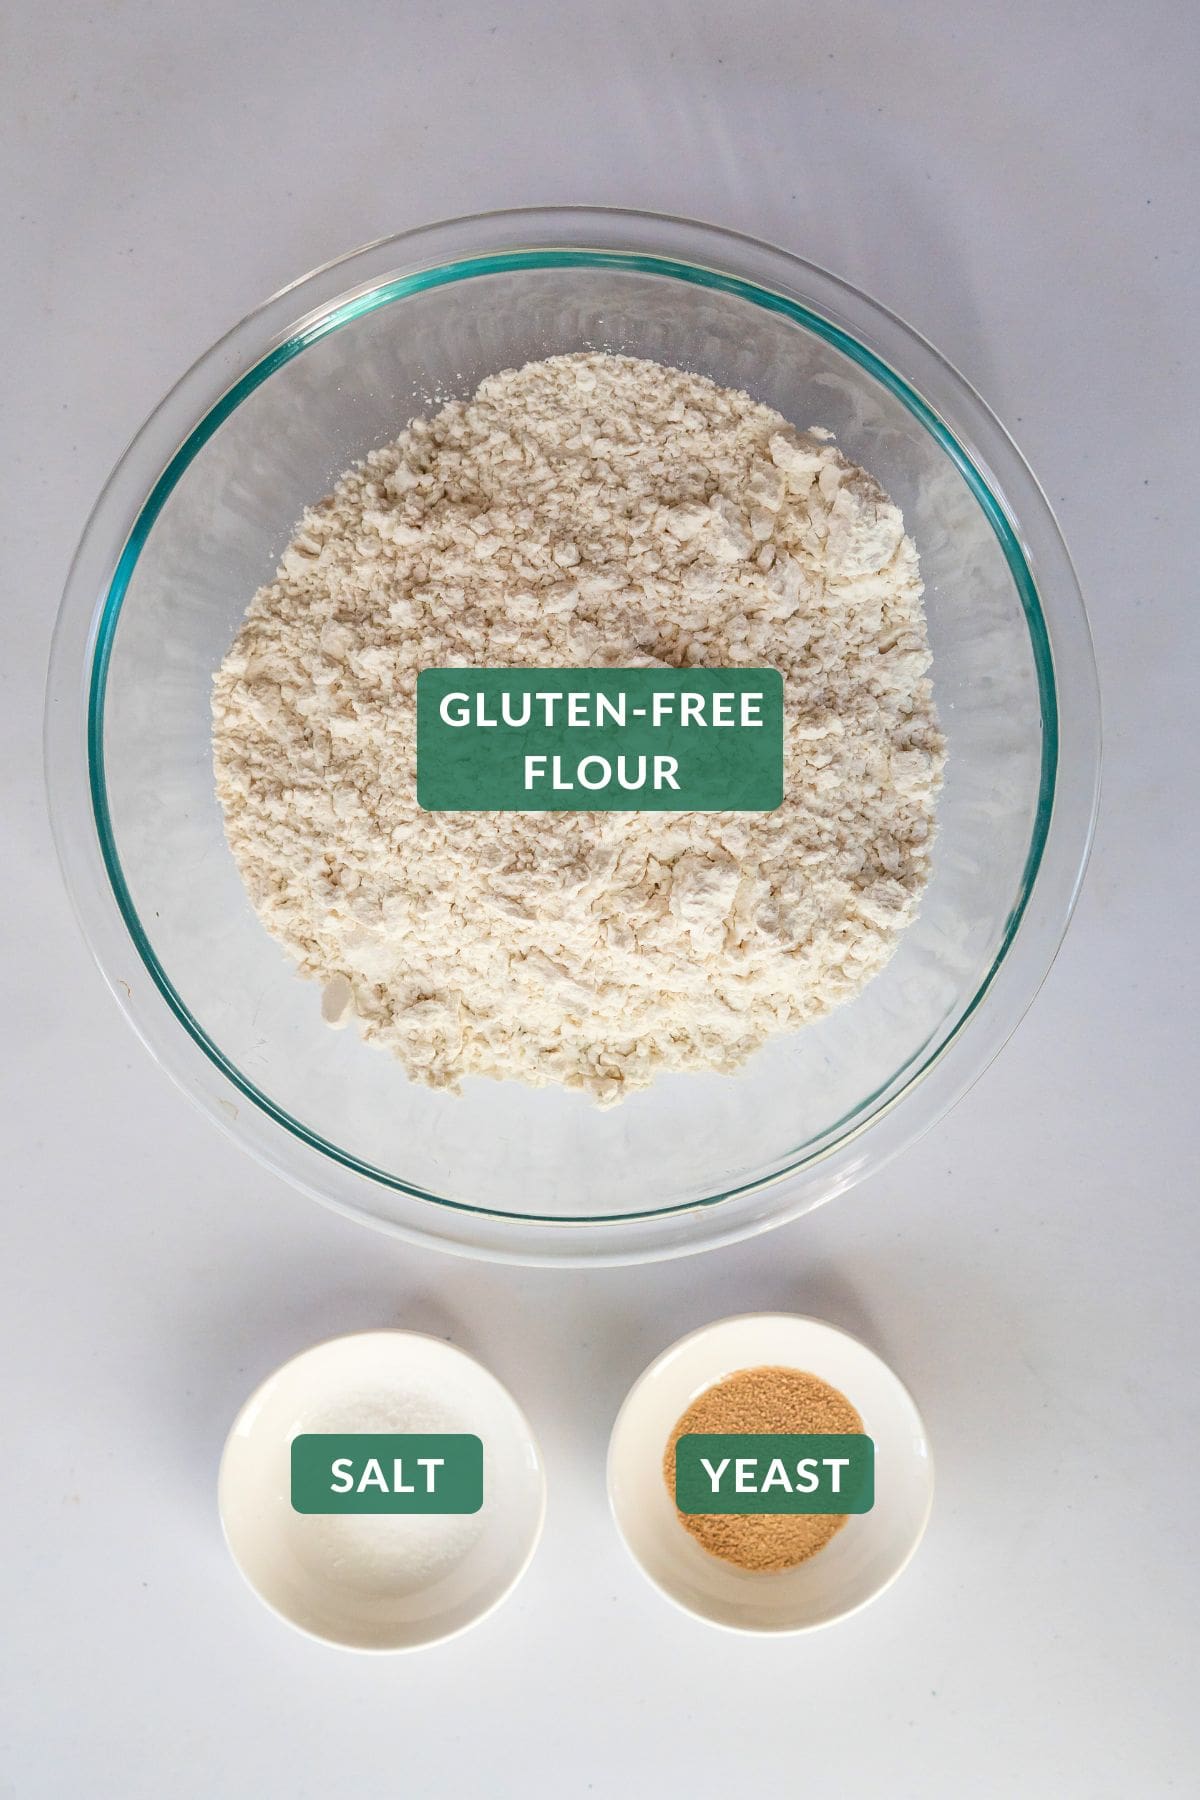
Gluten-Free Flour
What gluten free flour is best for bread?
The best pre-made gluten-free flours for bread are Pamela's All-Purpose Gluten-free Flour and Bob's Red Mill gluten-free flour. These two blends are tried and true for many baking recipes, and especially bread.
I used Pamela's All Purpose Gluten-free flour blend and found that the taste and texture of the gluten-free French baguette was just like the traditional!
Yeast
You cannot get a true baguette flavor without yeast! I promise that with this no-knead recipe, it will also be no fuss. However, if you prefer bread with baking soda, check out our Gluten-Free Irish Soda Bread recipe.
I used Red Star Active Dry Yeast.
Is dry yeast gluten-free?
Dry yeast is naturally gluten-free. However, some brands add starch to the final product to prevent clumping. Always check the ingredients list for additives or stick to a known gluten-free yeast brand, like Red Star.
Salt
Without salt, bread is simply flour and yeast. Perhaps salt’s most important role is making bread flavorful and delicious! Of course, we include it in this recipe.
Lukewarm Water
You will not find any milk in this recipe. While many gluten-free bread recipes include dairy milk, traditional baguettes are made with four simple ingredients: flour, yeast, water, and salt.
The French are known to delight in simple pleasures, and I am far from making complicated changes to traditional perfection.
Equipment
To get a proper gluten-free baguette shape, you will need to use a mold. This is because gluten is responsible for holding bread together so the bread can rise upwards.
In gluten-free bread, you replace gluten with xanthan or guar gums. These gums serve a similar purpose but are not as strong as gluten. You need a baguette mold to encourage vertical rise from the outside.
After a lot of research, I finally settled on this affordable silicon baguette pan. I highly recommend it, and this recipe will make the exact amount of dough needed to fill it.
If you'd like to make gluten-free yeasted bread without a mold, I recommend checking out my Gluten-Free Artisan Bread recipe.
Step-by-Step Instructions
These gluten-free baguettes are easy and beginner-friendly, with just 6 simple steps.
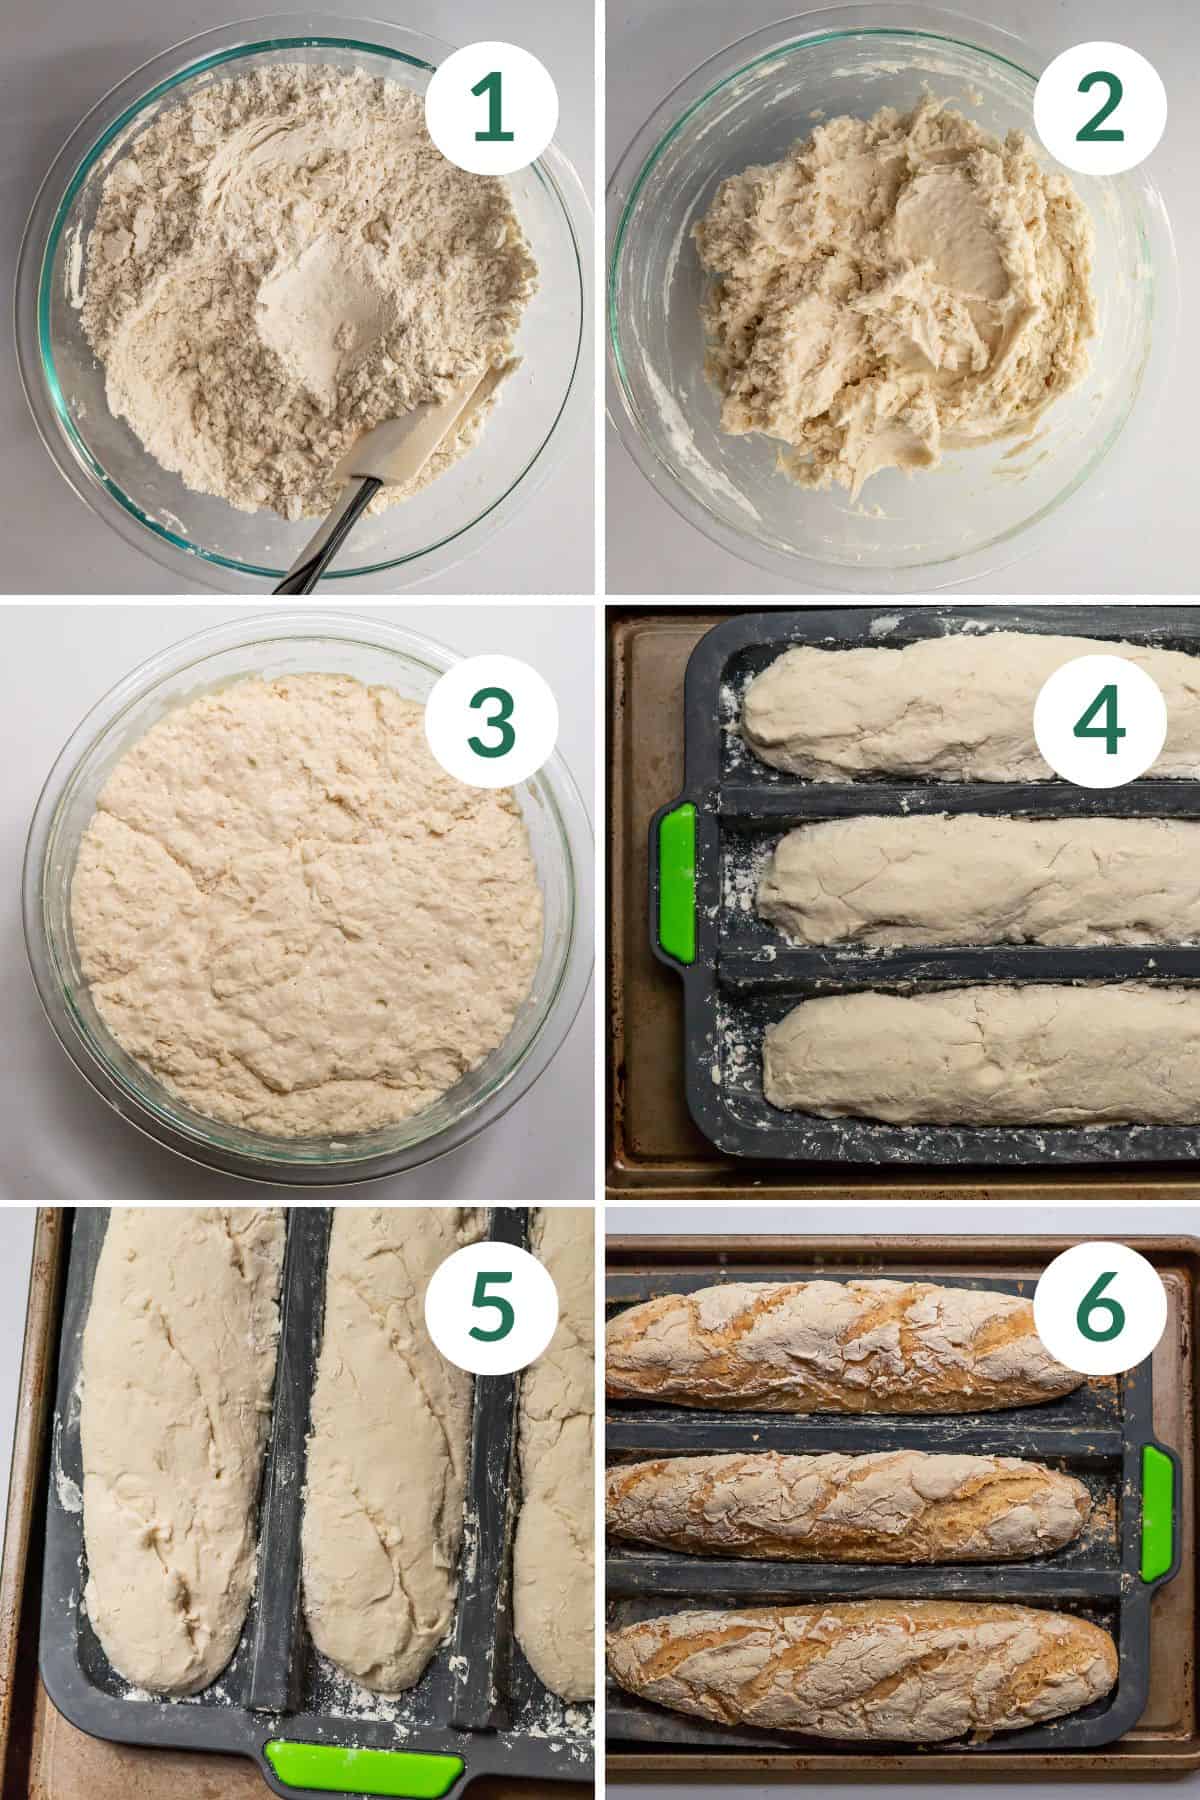
- Dry Ingredients: In a large mixing bowl, thoroughly mix gluten-free flour, yeast, and salt with a whisk.
- Water: Add lukewarm water in ¼-½ cup increments, stirring with a wooden spoon between increments.
- First Rise: Cover with plastic wrap or equivalent and let rise undisturbed for 8-20 hours in a warm location (I usually do overnight by the window in summer, or on the kitchen counter).
- Form Baguettes and second rise: Generously flour your hands and the silicon baking mold. Keep extra flour nearby to re-coat your hands whenever the dough gets sticky. Using your hands, shape the dough into three baguettes of equal size in the silicon mold.* Set the mold on a baking sheet to stabilize. Cover with a towel and allow to rise for 1 ½ to 2 hours.
- Score: Preheat oven to 450 degrees F. Using a sharp paring knife or kitchen scissors, score the baguettes.
- Bake: Place an oven-safe bowl or deep pan filled with two boiling cups of water on a lower rack in the oven. Place the tray of baguettes on the upper shelf and bake for 10 minutes. Remove the water bath and bake for 30-40 minutes more or until the crust is thick and browning.
Expert Tips
Get perfect gluten-free french baguettes on the first try with these expert tips!
Pick a good gluten-free flour.
Make sure that your gluten-free flour includes xanthan or guar gum. I recommend Pamela's All Purpose Gluten Free Flour.
Let it rise.
This recipe requires two rises. The first is for 8-20 hours (usually overnight) just after mixing the dough.
The second is after the bread is formed (and before scoring) for 1-2 hours. If you cut rise time short, your baguette will be more dense.
Bake with a water bath.
This is a super fun trick I'll be using for all my future crusty bread recipes! Pour two cups of boiling water in an oven-safe bowl or a deep pan.
Make sure there are two racks in the oven. The water bath goes on the lower rack, with the bread loaves on the upper rack. Then you bake for 10 minutes before removing the water bath.
Don't open the oven.
Other than removing the water bath, keep the oven closed for the duration of baking. Releasing heat too soon can prevent the bread from rising or forming a tough crust. You can use the oven light to check on progress.
Let parts of the crust get nice and brown.
I recommend baking past golden brown, when you notice a nice browning crust. This yields the best inner and outer texture.
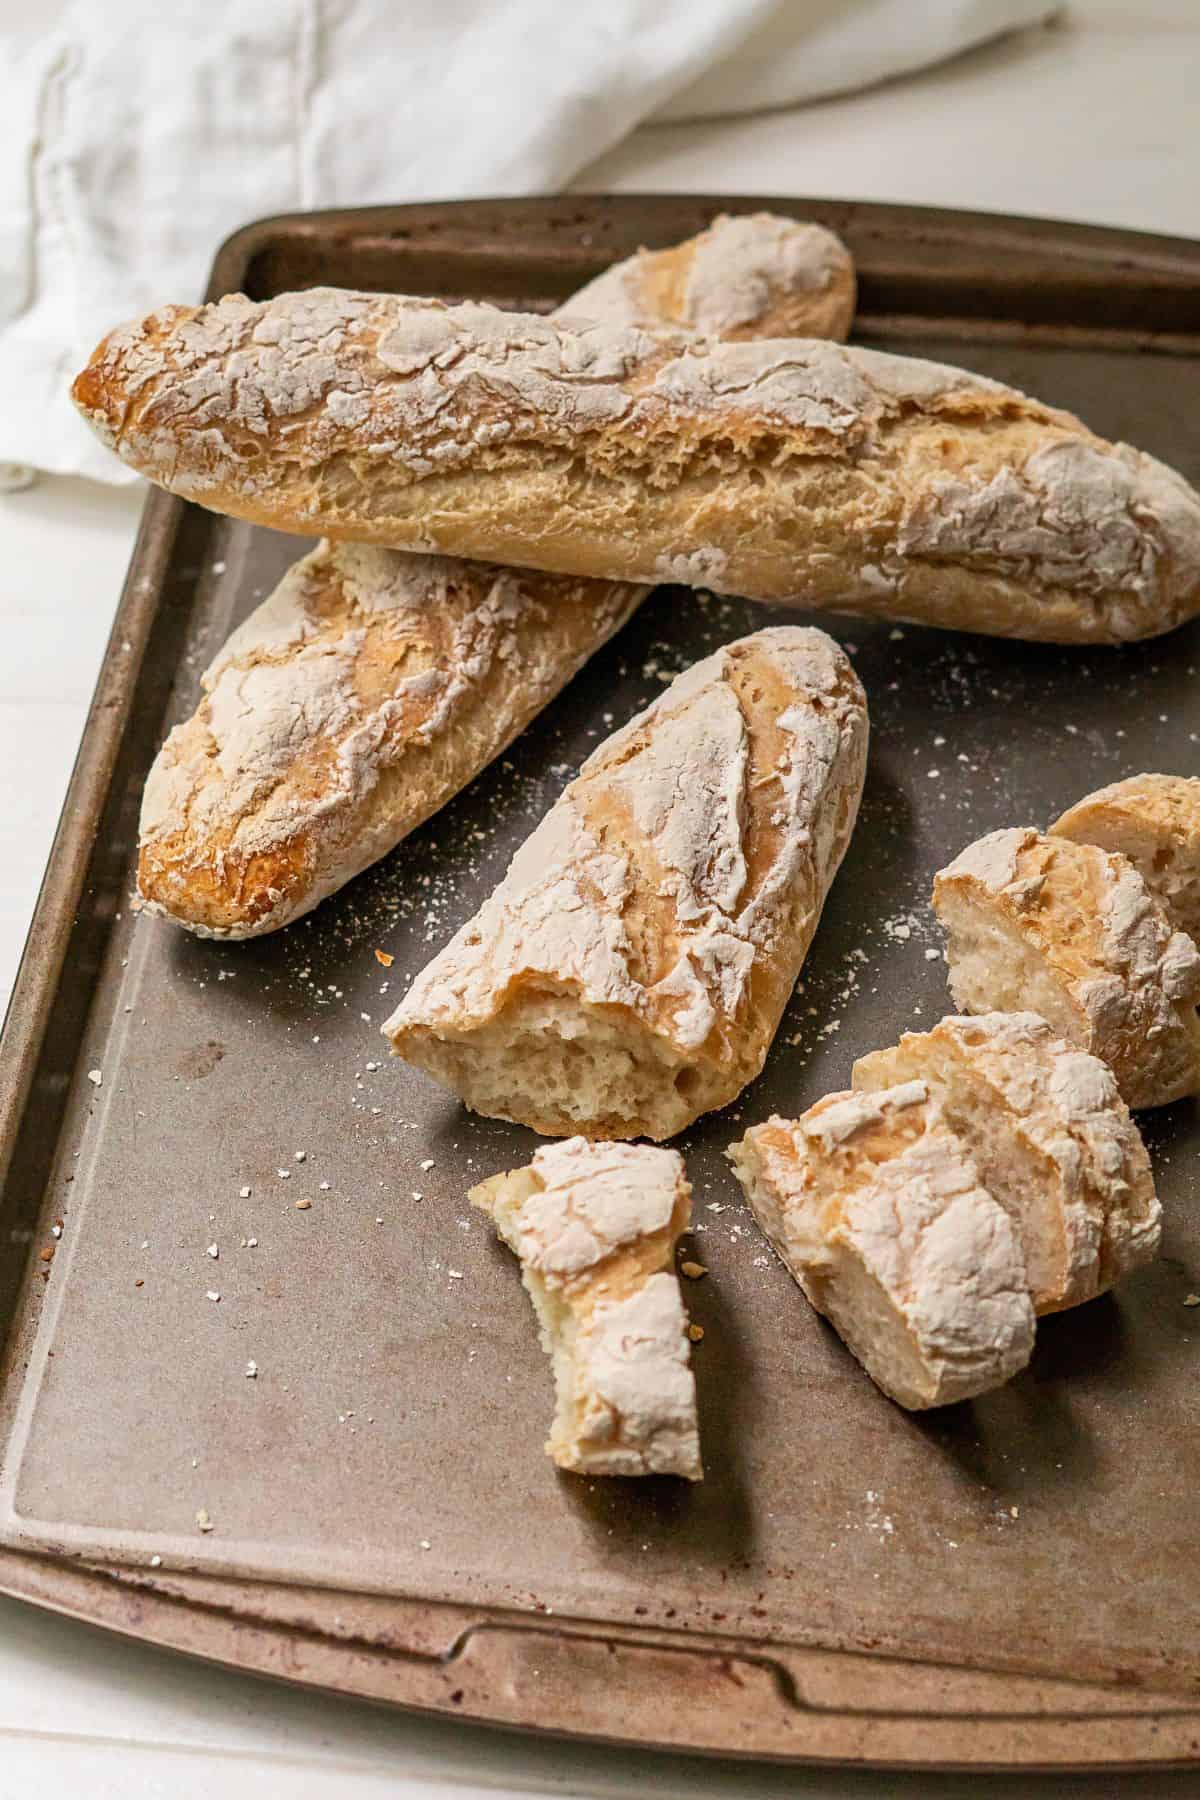
Troubleshooting - why is my baguette not crispy?
Baking at a high temperature for at least 40 minutes is the most important step for making a french baguette crispy.
Adding a water bath of 2 cups of boiling water in a bowl or pan on a rack below the bread for the first 10 minutes of baking will also encourage a crispy crust.
Here are some reasons why your baguette may not be crispy:
- You did not bake it long enough. Golden-brown is not enough for a crispy baguette crust. You want the bread to have some areas that are a solid medium brown, indicating that it is crisp and baked through.
- You didn't wait for the oven to preheat. For any baked good that needs to rise, the first 5 to 10 minutes of baking are crucial. If you put your bread in while preheating, you get a soft crust and dense texture.
- You didn't include a water bath while baking. According to Lifehacker, the water bath “helps dissolve sugars on the surface of the dough that caramelize during baking and give you a glossy, crisp crust.” Place two cups of boiling water in an oven-safe bowl or deep pan. Then set it on the rack below your bread for the first 10 minutes of baking.
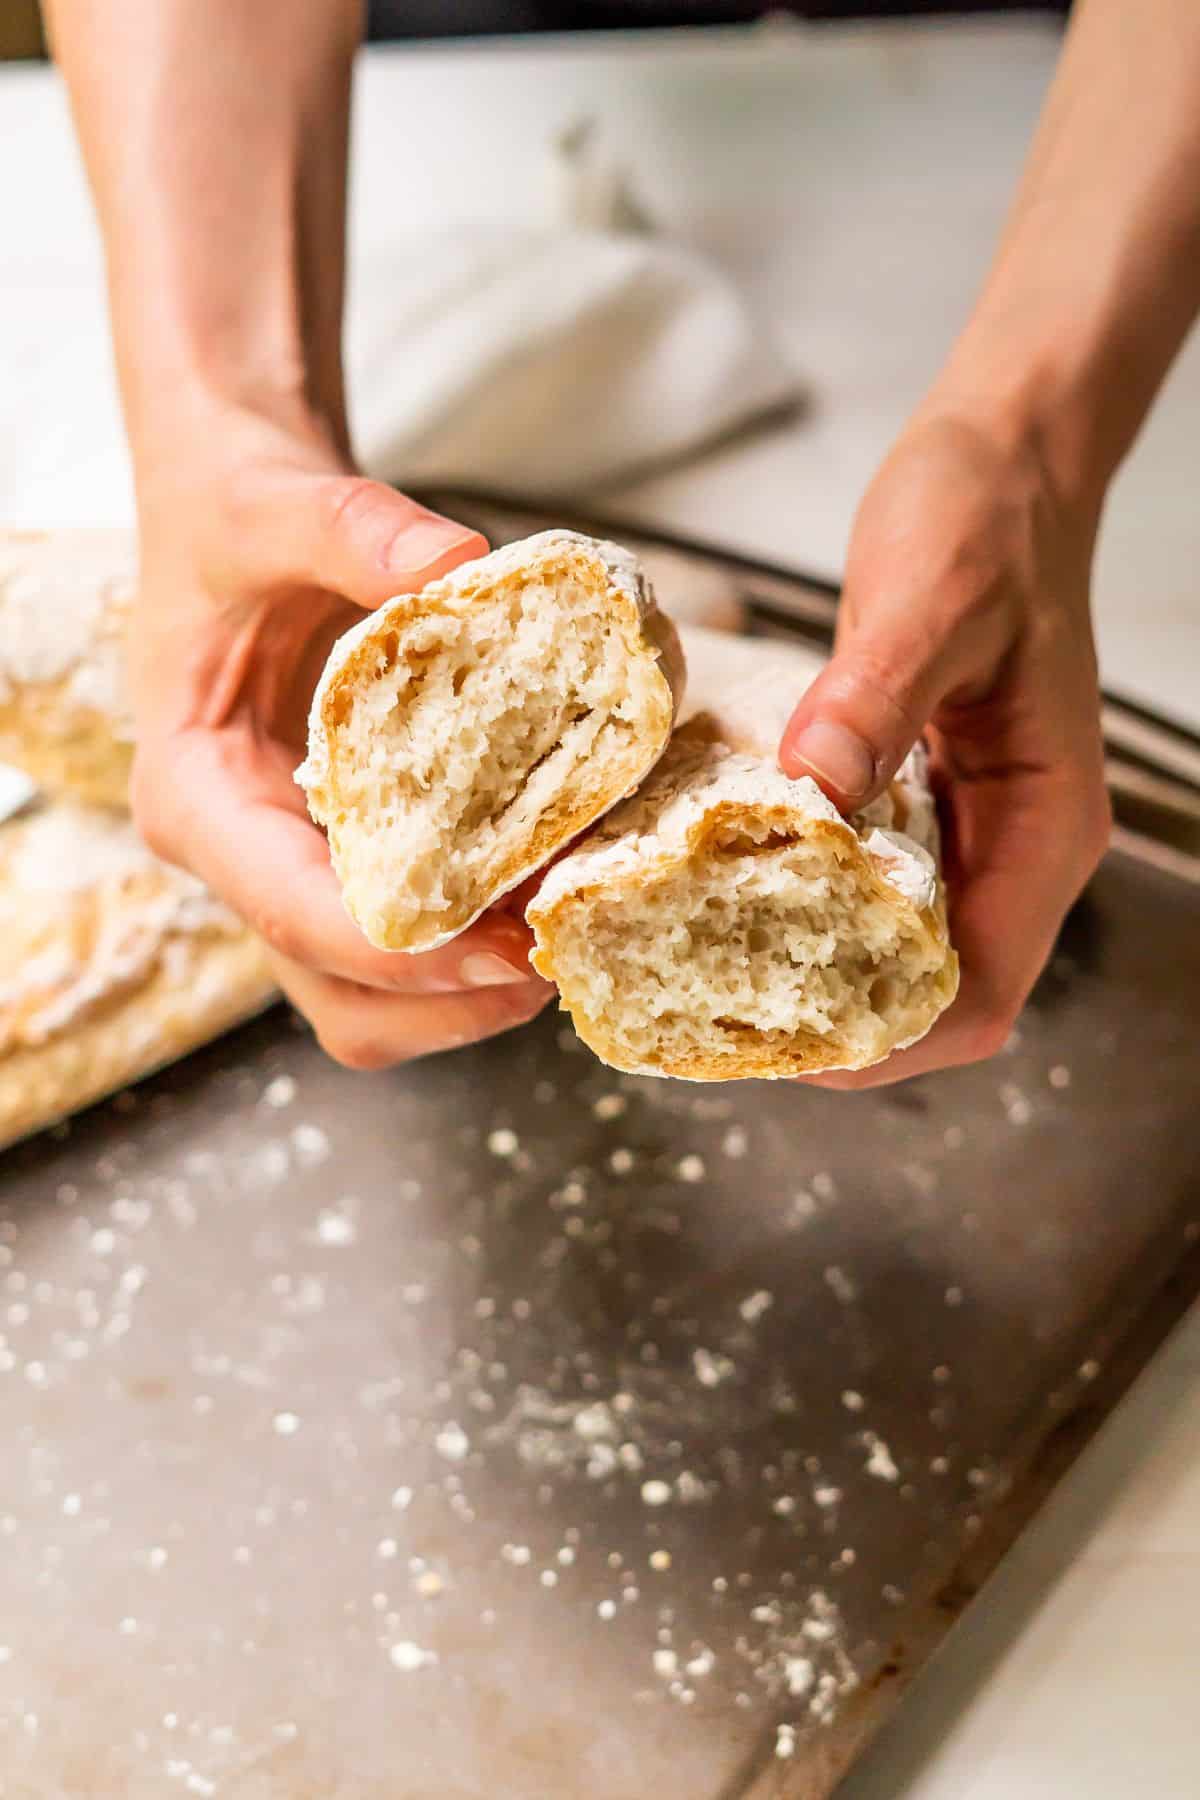
What do the French put on baguettes?
The French love to layer butter or jam on their baguettes, and rarely eat the bread plain by itself. Other delightful accompaniments include butter with a thin slice of ham, cheese, chocolate spread like Nutella, and honey.
French bread is also commonly used to wipe the plate clean at the end of a meal.
What I eat on a gluten-free french baguette
I almost always make French baguettes with soup or stew. I also love adding coconut butter and a pinch of sea salt (the dairy-free version of ‘salted butter’) or honey. If I make enough, it's also my favorite sandwich bread!
French bread never lasts long in my house, and with this recipe, it won't last long in yours either!
Related gluten-free bread recipes to consider...
Looking for more delicious gluten-free bread recipes like this gluten-free french baguette recipe? Check these out:
Love this recipe? Please leave a 5-star 🌟🌟🌟🌟🌟 rating in the comment field or recipe card below. Thank you!
Gluten-Free French Baguette
Ingredients
- 4 cups gluten-free flour** (I used Pamela’s All-Purpose Gluten-Free Flour, 500 grams)
- 1 ½ teaspoons active dry yeast
- 2 ¼ cup lukewarm water
- 1 teaspoon salt
Instructions
- Dry Ingredients: In a large mixing bowl, thoroughly mix gluten-free flour, yeast, and salt with a whisk.
- Water: Add lukewarm water in ¼-½ cup increments, stirring with a wooden spoon between increments.
- First Rise: Cover with plastic wrap or equivalent and let rise undisturbed for 8-20 hours in a warm location (I usually do overnight by the window in summer, or on the kitchen counter).
- Form Baguettes and second rise: Generously flour your hands and the silicon baking mold. Keep extra flour nearby to re-coat your hands whenever the dough gets sticky. Using your hands, shape the dough into three baguettes of equal size in the silicon mold.* Set the mold on a baking sheet to stabilize. Cover with a towel and allow to rise for 1 ½ to 2 hours.
- Score: Preheat oven to 450 degrees F. Using a sharp paring knife or kitchen scissors, score the baguettes.
- Bake: Place an oven-safe bowl or deep pan filled with two boiling cups of water on a lower rack in the oven. Place the tray of baguettes on the upper shelf and bake for 10 minutes. Remove the water bath and bake for 30-40 minutes more or until the crust is thick and browning.
Notes
** Gluten-Free Flours: I tried both Pamela's All-Purpose Gluten-Free Flour and Bob's Red Mill 1-to-1 gluten-free flours and this recipe works great with both! The dough is a little more wet with Bob's Red Mill 1-to-1 and the final product is still excellent. Note that King Arthur GF Measure for Measure flour says "Not recommended as 1:1 substitute for yeasted recipes" on the packaging, and will not work with this recipe. For more flour notes please read the comments. Storage: Store on the counter for up to 3 days, wrapped in a cotton dishtowel. You can also freeze the baguettes for up to 3 months. Allow to cool and wrap in plastic or slice into a ziploc bag before freezing. Reheat frozen baguettes in the oven at 400 degrees F until heated through (about 5-10 minutes).




Gary
So I started a sourdough starter with King Arthur measure for measure before I read this recipe. The starter seems super happy and active. But I started it in order to make bread lol. So is useable in this recipe in place of yeast or should I abandon the starter? Thanks!
Jamie
Hi Gary! Unfortunately I have not done a deep dive into gluten-free sourdough yet so I can't say for sure if the starter would work. Since this recipe makes 3 small baguettes, you could try splitting the ingredients and making 2 with yeast and one with starter. If you do try it, I'd love to know how it turns out!
Stephen Foglio
Hello Jamie-- I made the recipe using Bob's Red Mill G/F/ All-purpose flour and the dough was too soupy so I added perhaps 1/4 cup extra. After setting for 10+ hours, then separating and placing in bread mold, the last rise was not too noticeable.
The finished product was good -- bread brown, crusty and a bit tough. I like it nonetheless yet any advice would be greatly appreciated.
Jamie
Hi Stephen -- The dough is pretty wet when it's done right. More like a drop biscuit texture as someone suggested above. I've tried this exact recipe with Bob's Red Mill 1-to-1 gluten-free flour and it worked out well, and should still have been fine with an extra 1/4 cup (maybe a little dense or dry but nothing too bad). Did you use the All-Purpose flour with garbanzo bean flour? It's very possible the bean flour could have a very different effect. In which case I recommend trying a rice based flour. I can guarantee the Bob's Red Mill 1-to-1 will work well but I prefer Pamela's All Purpose GF Flour for yeast breads. Let us know how it goes or if we can provide more insight.
Kaya
These are some kind of magic! I almost gave up too soon because the dough was way too wet and sticky compared to
traditional baguettes I used to make before I was gluten free. But don’t give up! They turned out perfect. I’m making another batch today!
Tamra
I just mixed up the dough and will be impatiently waiting for the rise, salivating the whole time in anticipation. I haven’t made bread in a couple years and am more than ready to enjoy a fresh baguette. That said, how wet should the dough be? I still had at least a half cup of water lettuce and the dough seemed plenty wet, compa d to my past bemread making experience. I think the additional water would have made it more like a thick batter, so I didn’t add it. Will I be sorry?
Jamie
Hi Tamra! The dough should be very wet compared to a traditional wheat bread dough. The texture is more like a drop biscuit, and it would be impossible to knead. It should not be quite as wet as a muffin batter. Some gluten free flours absorb water differently -- the dough was a bit more wet when I used Bob's Red Mill, and a little less wet when using Pamela's. If the dough is rising nicely (wet, sticky, bubbly) I think it would be fine to leave out that last bit of water. Just keep in mind that they make cook a bit faster or be a little too hard at the end (maybe good for croutons in that case?).
Wendi Siegel
The recipe for 1x says it yields 9, but you said here in a response that it yields only 3. Please clarify. I was going to triple the recipe (3X), but I don't want 27 baguettes. 9 would be fine.
thanks
Jamie
Sorry for the confusion Wendi -- 1x will yield three medium-sized baguettes using the loaf pan that I linked. 3x would make 9.
M
Jamie,
I used exactly your ingredients, same loaf “pan”, full rise times, and followed all instruction, baking for 40min at the end. The loaves look awesome and are wonderfully crusty, but, the inside is gooey. What might have happened? Any advice for the next try?
Thanks,
M
Jamie
Hi M! I recommend baking them for a bit longer, even as much as 10-15 minutes more depending on how gooey it was on the inside. The crust can reach a medium brown color (darker than a typical golden brown) without the crust getting too hard.
You could also add about 50 grams more flour (a little over 1/4 cup) depending on which you used -- I found that Bob's Red Mill absorbed water a little differently compared to Pamela's. I had to bake them a little longer during a trial with Bob's Red Mill, and they also worked well with just a little extra flour (but also not necessary if you extend the baking time).
Linda
Just made this following your directions to the letter. Absolutely fantastic. Crisp crust, chewy center with nice structure … reminiscent of the tiny baguettes I had for breakfast at George V once upon a time. Thank you so much for this recipe … truly life changing!
Jamie
I am so happy to hear it Linda! Thank you for the review!
Stephanie
Hi! Do you know if Authentic Foods Gluten Free Multiblend flour would work for this recipe? Or Pillsbury Gluten Free flour??
Jamie
Hi Stephanie! I haven't tried either of these flours so I couldn't say for sure. However, they both have similar ingredients to the flours I use. Pilsbury has pea flour and is the most different from the ones I use, so if you're going to try, I would suggest using the Multiblend Flour. The Multiblend Flour has more brown rice flour (mine has more white rice flour) and that may alter the water absorption.
The final consistency should be far more watery/soft/sticky than regular gluten bread dough. Someone suggested that it's like a "drop biscuit batter consistency" and I think that's pretty accurate. If you aim for that texture, I think there's a good chance it could work out!
Maria DeSimone
Hi Jamie, I was excited to try your easy recipe. On the first rise, I did 12hours which was about 150% & 2nd rise about 3 hours but didn’t seem to rise more. I was pleasantly surprised the baguette was brown & crusty. However it was gummy inside.
Not sure if it needed more rise time or if I needed to adjust oven to bake inside longer. I measured Pamela’s flour by cups, should I have weighed by grams? I appreciate your help as I would love this easy recipe to work.
Thanks, Maria
Jamie
Hi Maria! As for measuring by cups or grams, this recipe is pretty flexible so either should work out fine. I would recommend baking a little longer in the future, as long as the crust was still in the range of golden brown to medium brown in color. I've had to adjust my cooking times by 5-10 minutes when using different ovens, and I suspect yours may simply require a longer cooking time.
I'm not sure about the second rise, but I don't think you need to let it rise any longer. Letting it rise longer may actually lead to a minor collapse during baking if the bubbles get too large. I found the rise to be small but still important to keep the baguettes from getting too dense.
Good luck with round 2!
Jenn
I'm definitely going to make this. is there a reason you chose to bake in silicon over metal? perforated vs non perforated? gf baking success can be dependent on the pans used.
Uri
By "shape the baguettes" do you mean press out the air, form and let rest like you would with normal doughs, or touch the dough as little as possible to keep all the air in? I made them today and they rose close to nothing during the 2H rise...
Jamie
Hi Uri - I don't knead the dough by pressing out the air since it is too sticky and gluten-free dough doesn't quite knead the same way as traditional dough. It's more of the "touch the dough as little as possible" style. I scoop the dough into the mold and gently smooth and push it around until it fits nicely in the pan and has a baguette-like shape. Then I allow it to rise for the additional two hours. How did the recipe turn out?
Paula
Regarding Bob's Red Mill...I've used both the 1:1 GF flour and the all-purpose GF flour for this recipe. Definitely the 1:1 is the way to go with this recipe. The all-purpose made the baguettes too dense. Also, the first time I made this recipe, the dough was very wet. The last 2 times I've made this recipe, I used my KitchenAid dough hook on the lowest setting and the dough was not nearly as wet. Not sure if I was just not mixing well enough with the wooden spoon, but the mixer did a much better job than me pulling together the dough. All in all, this is a great recipe and love having GOOD bread again!
Jamie
Wow Paula these are great tips -- thank you so much for sharing! I'm so glad it worked out for you and that you can enjoy good bread again!
Uri
Do you have amy experience with Schär Brotmix? It's the only one that is readily available and priced decent enough for most people to use it. Their own bread recipe works wonders but sometimes I need to watch out what online recipes I use since a good chunk of them fail...
Also 1.5tsp seems like a small amount since most recipes use 2tsp for 500g of flour?
Jamie
Unfortunately I do not have experience with Schaer Brotmix and it is not available near me. It has a fairly different composition than the flours I use since there seems to be more corn than the rice flour-based mixes I used for this recipe. I have also only used flours that include guar gum or xanthan gum to help replace the elasticity of gluten, and that seems to be missing in Schaer Brotmix. If you decide to give it a try, please let us know how it turns out!
1.5 teaspoons of yeast works fine for every trial I've done for this bread recipe -- I believe I've made it at least 10 times by now!
Marilyn
Can I freeze the dough if I make only one loaf?
Jamie
Hi Marilyn! Yes you can freeze the dough. You'll want to freeze it after you form baguettes, but before the second rise. Here's what I do:
1) Cover the baguette mold/pan loosely with plastic wrap and put the baguettes I'm freezing in the freezer.
2) The next day after the dough is frozen, I remove the mold/pan and wrap the frozen baguettes fully in plastic wrap. Then put them back in the freezer.
3) When you're ready to bake them, remove the plastic wrap and put it back in the mold. Then let it rise in a warm location for about 4 hours (double the usual rise time). The dough should just about double in size.
4) Bake as usual after rising.
My loaves were just a little denser when I froze them, but still very good. And I may not have let them rise as much as I should.
Kiley
I am new to GF baking. I have only King Arthur “GF Measure for Measure” flour. It contains xanthan gum. It’s hard to tell from pics on Amazon, but it looks like the recommended brand/variety of flour (Pamelas artisan) does not have xanthan gum in it. Okay if I use my king arthur GF flour with xanthan gum in it? Or will that ruin the bread?
Thanks
Jamie
Hi Kiley! I would NOT use The King Arthur Measure for Measure Flour. On the packaging, it reads "Not recommended as 1:1 substitute for yeasted recipes." I think it may be related to the iron and calcium fortifications.
I also just had a reader message me and say that their King Arthur Flour baguette was 'hard as a rock'. I'm not sure which of the King Arthur GF flours they used, however.
Xanthan gum is not the problem -- Bob's Red Mill 1-to-1 Gluten-Free Flour works great (know that the dough might be more wet than the photos but it turns out well regardless). And Pamela's has Guar Gum which works similarly.
I hope this helps!
Kiley
So glad I asked! Thank you!
Megan
I'm glad you did too! I use king Arthur all the time and have never noticed that on the package. So good to know 🤣
Jennine Nicastro
Thank you so much for sharing this recipe. I was kinda thinking that it would turn into a bready biscuit type baguette, especially since the batter has that drop biscuit consistency. I was FLABBERGASTED when I took it out of the oven, rested it (next time I will wait until it is much cooler, because it does behave just like fresh bread and the steam made it a bit gooey), and sliced into it. Chewy! What!? Crusty! What!? I made it for French dip sandwiches, and the loaves absolutely held up to the au just. I assumed they would get soggy and fall apart. Not at all! To anyone who is questioning if this truly works, it does. It really does. And it tastes great! As close as you can get to wheat bread.
Jamie
Thank you so much for sharing your review Jennine! I am so happy to hear you are enjoying these baguettes too 🙂
Cora Saxton
I made this with mediocre gluten-free flour and they still tasted great! I was pleasantly surprised. Thank you for bringing baguettes back into my life!
Joy
I bought the baguette pan and made this three times! Every time the dough was a little different but the baguettes were perfect. You weren't kidding about "foolproof". Love this recipe and I plan on making it *literally* forever.
Mary Mc Milleon
I have a baguette pan that makes 2 breads, not 3. How would I adjust the baking time to accomodate this situation?
Jamie
I haven't tried this recipe with a two-baguette pan. I think it would take a bit longer -- I would guess about 7-10 minutes. When you remove the bread, it should have a golden crust (or even slightly darker than golden) and you should hear a hollow sound when you tap on the loaf. If it sounds too dense, then the inside is probably still a bit moist and it needs a little more time. I hope they turn out amazing!
Lucy
Amazing!! The smell of home-baked bread filled my home for the first time since being diagnosed with celiac several years ago. Will need to invest in the baking pan, but I made it in a loaf pan in the meantime since I couldn't wait. Thank you!!
Madison
I am so excited to try this recipe and am going to order the baguette pan. :0) I've made traditional bread / pizza dough before I was diagnosed with celiac, and I remember kneading the dough. It looks like you just mix this, let it rise a couple of times, and pat it into place. Is that correct - no kneading required?
Jamie
You got it Madison! No kneading whatsoever. It seems too good to be true but alas, here it is 🙂
Cynthia McCulley
Which Bob's Red Mill GF flour do you use? There is the All Purpose Baking Flour and the 1-to-1 Baking Flour. I have been reading up on baguettes since I have the pans and used to make a french bread from an old Bette Hagman GF cookbook, but that recipes uses too many ingredients to truly be a baguette. Will try yours! Thanks!
Jamie
Hi Cynthia! I used Pamela's GF All Purpose Flour which is very similar to Bob's Red Mill GF 1-to-1 baking flour. I would definitely choose the 1-to-1 over BRM All Purpose GF flour for best texture and taste. I'd be excited to hear how it goes for you! Happy baking!
Mel
Hi Jamie!
Does the recipe make 3 baguettes or do I have to click 3x on the recipe to make 3??
Might be silly or I might have missed it!
Thanks!
Jamie
Hi Mel! The 1x of the recipe makes 3 small-ish baguettes that fit the mold I recommended. Happy baking!
Sara
Just bought the loaf pan and am *so excited* to make this. The recipe looks so easy.
Tierney
Hi! If I am using active dry yeast do I need to activate it first? Or just add it to the dry mix? Thanks
Jamie
Hi Tierney! You can just add it to the dry mix. Happy baking!
Mo
Turned out great. Just thought baguettes were a bit bland. Any suggestions for a bit more flavor.
Jamie
I'm so glad they worked out for you Mo! A little more salt or some spices could add a bit more flavor. Please let us know if you find a combination you like.
MJ
I made this with Namaste flour. It turned out well, but I don't recommend eating fresh out of the oven because it's very gummy. Once it cooled it was fantastic! The crust is sooooooo crunchy. I might try baking this one a little longer next time, since the middle wasn't quite done, but I was really excited to try it hahaha.
Jamie
Thanks so much for the review and details MJ!
Angie
Hi MJ,
I have tried this recipe 2 times now with the Namaste flour too and it always comes out extremely gummy. This last time I left one in the oven for 75 minutes and it was still gummy inside and rock hard outside. I am baking in glass bread pans…just curious how your next round turn out and if you are using metal or glass pans.
Thanks!
Angie
Monique
It's like you said - I had it all in my kitchen already! Made these in a loaf pan but will buy the baguette pan for the future so I get the right shape. Thank you!
Protima
How long does it take to bake this as a single loaf in a loaf pan?
Jamie
Hi Protima! I've only baked them in threes since they're pretty small and we finish them fast. I would guess that the cook time would be a little less, but probably not by much. I would start peeking in the oven using the oven light (you won't want to open it and disrupt the rise) every 5 minutes or so after about 25-30 minutes. When the bread is finished, it has a thick golden to medium-brown crust and should sound hollow when tapped.
I'm hoping someone who tried this will chime in with their experience! Good luck, and I'll update my findings when I have a chance to give it a try.
Cheryl
Made this exactly as listed and dough never rose. Plus, the ingredients, after mixing, were dry and the dough wouldn’t stick together. Tried this recipe twice, same results. Used cup to cup GF flour. Have made artisan bread successfully with this dough before. Bummed!
Jamie
I'm sorry to hear it didn't work out for you. I haven't tried using the Cup4Cup brand -- was the artisan bread you made successfully a yeasted bread? Some gluten-free flours have a note on the package about not using it for yeasted breads. I'm unfamiliar with this brand.